Categories
Build a block quilting scraps sewing

Build a Block 5M Road to White House

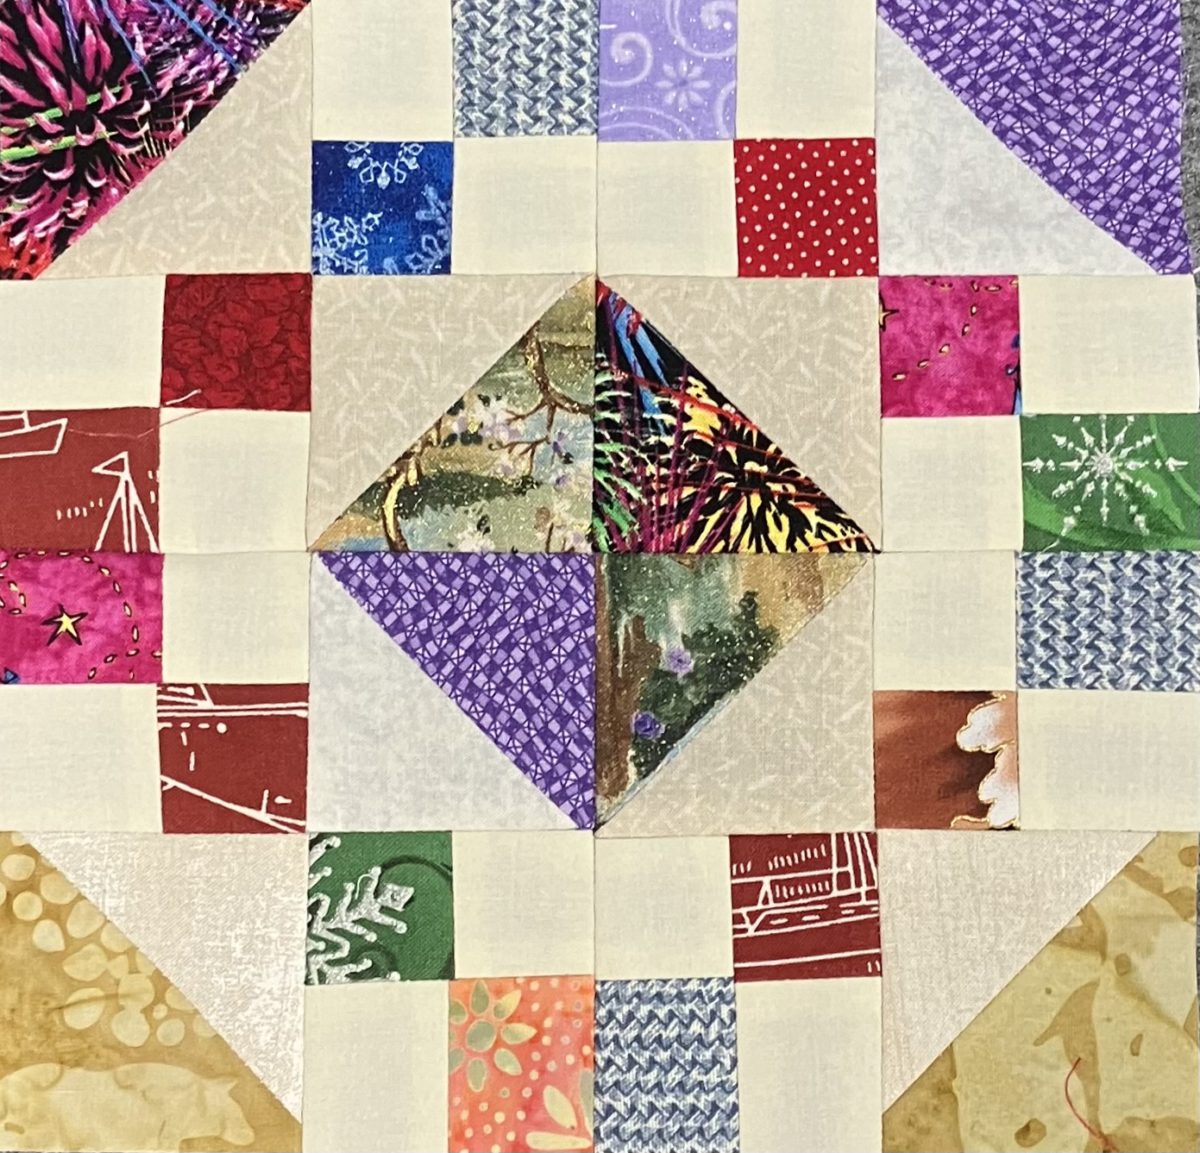
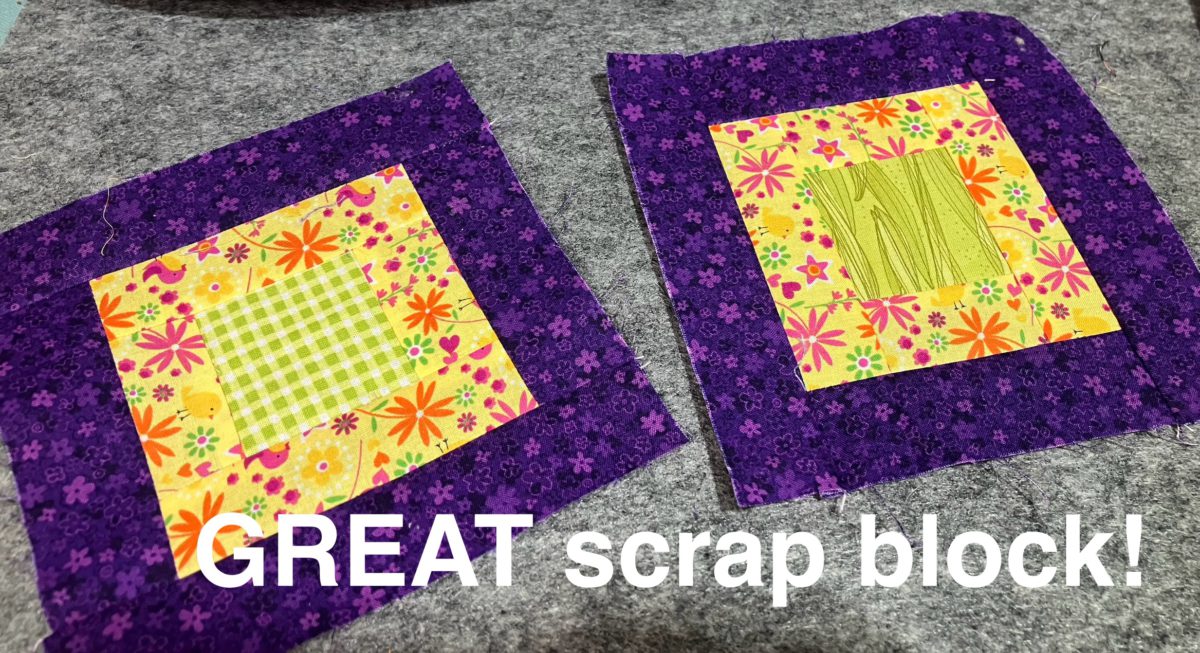
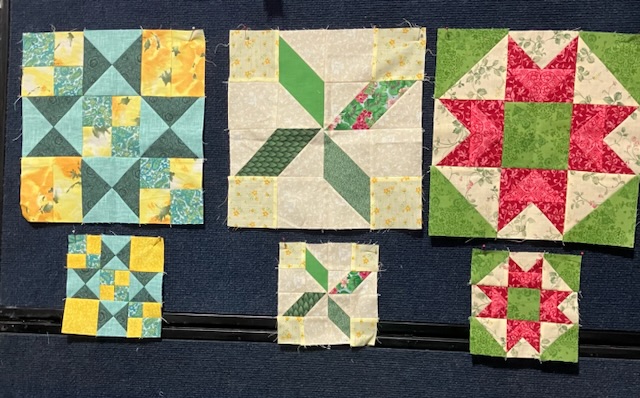
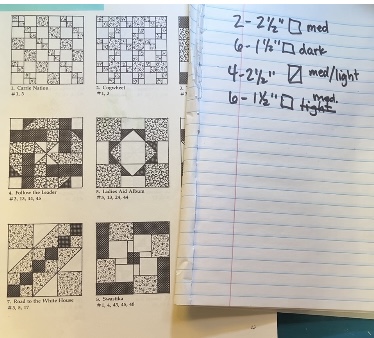
Again this week, I am getting my idea for a scrap block from the Maggie Malone book from the 80’s. I present this block in 3 sizes at the end of this post. A YouTube video is also available for your viewing pleasure.

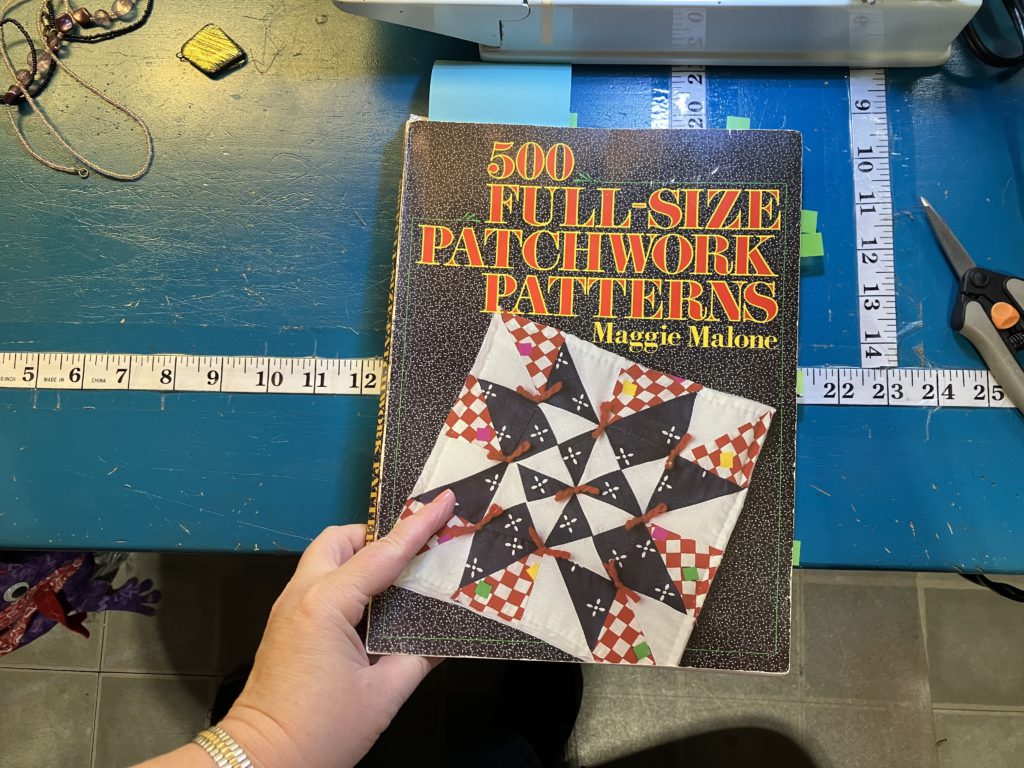
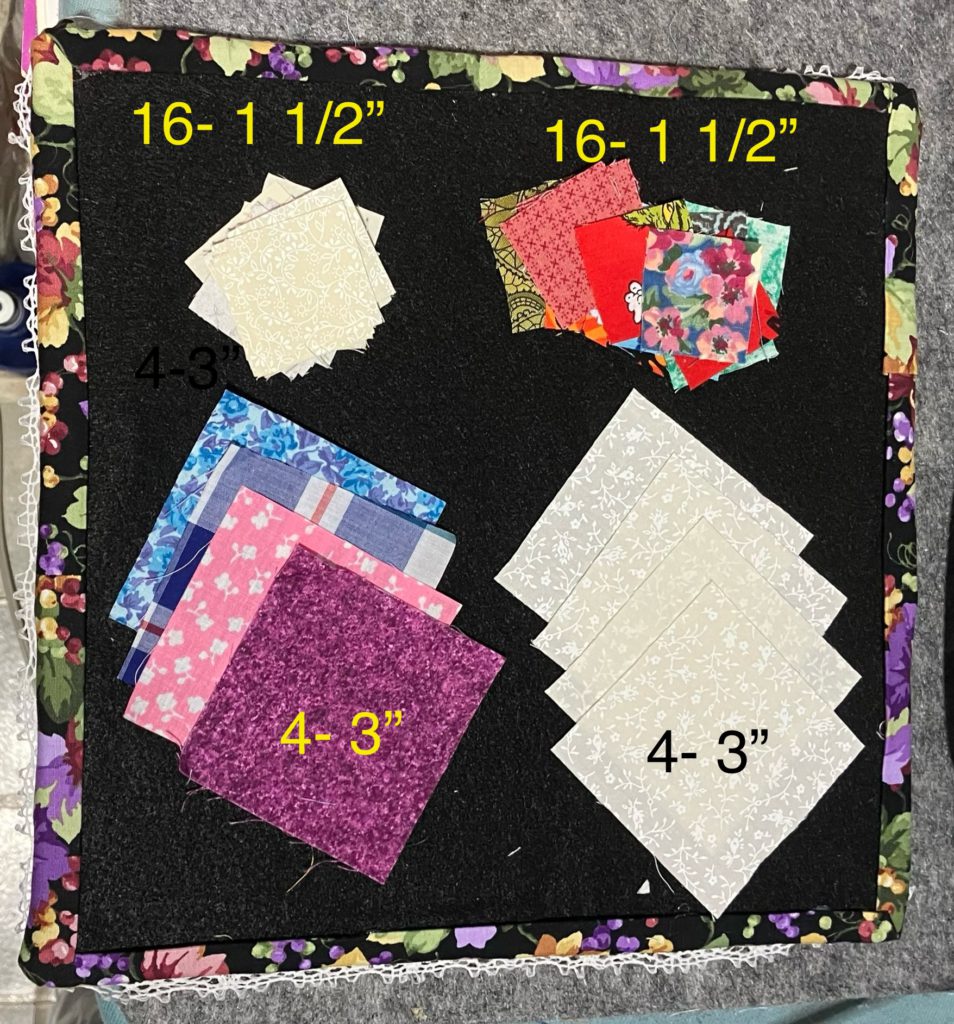
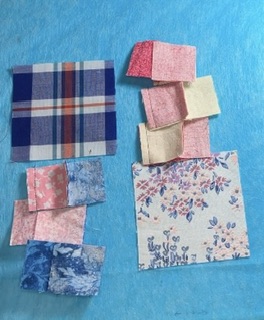
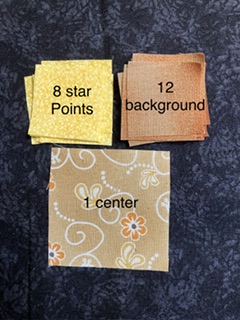
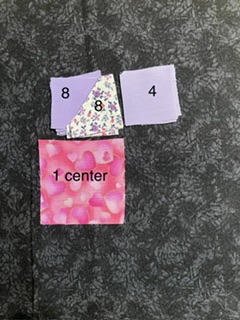
This book is my muse. It only offers templates to be cut. Thank you, but not today! For the video and below, I list the pieces needed for the 6 1/2″ block.

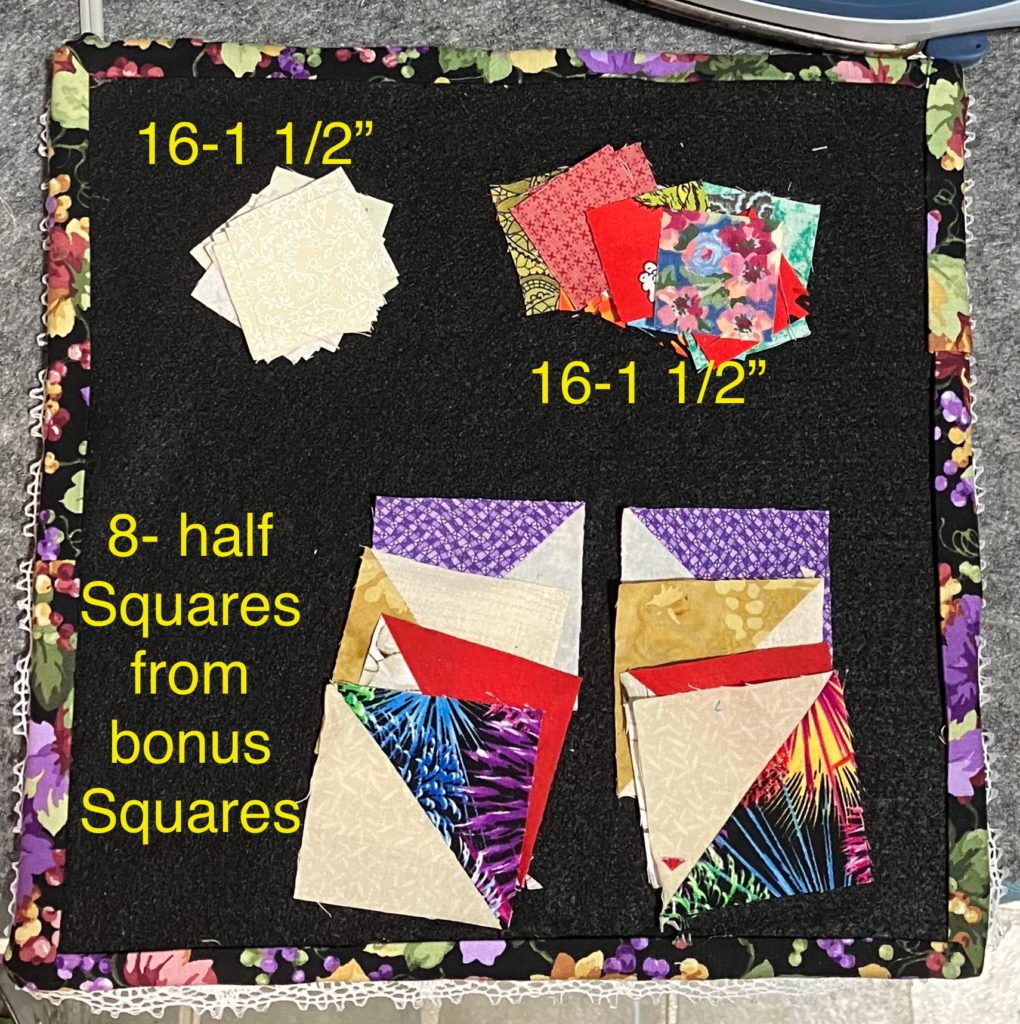
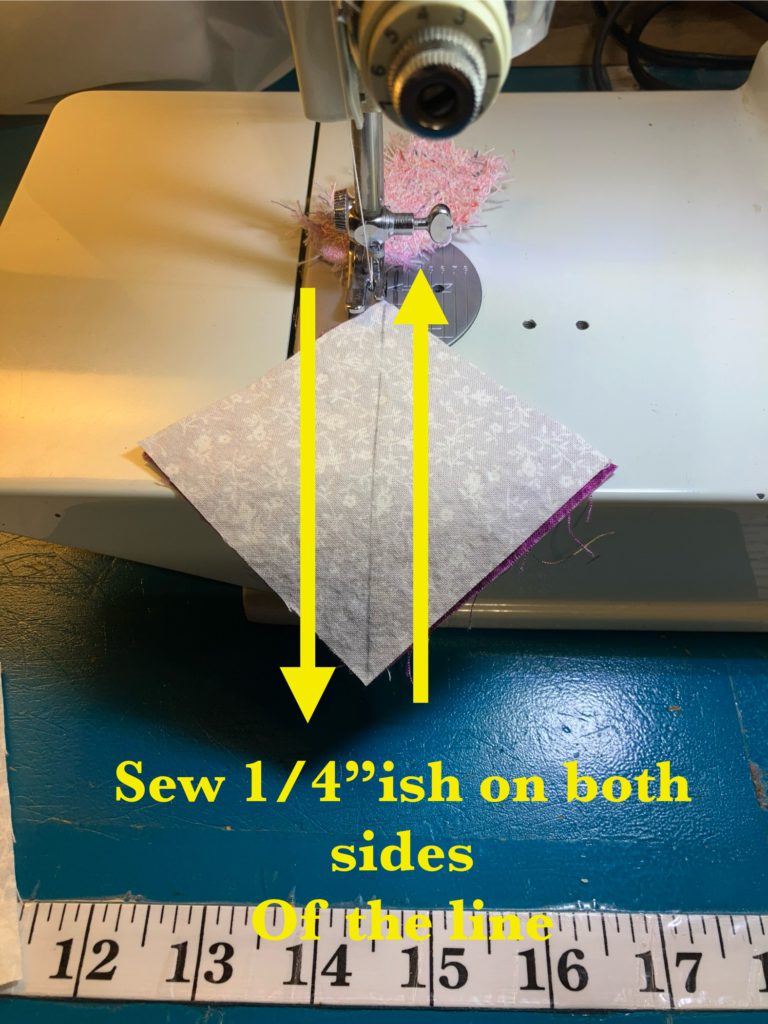
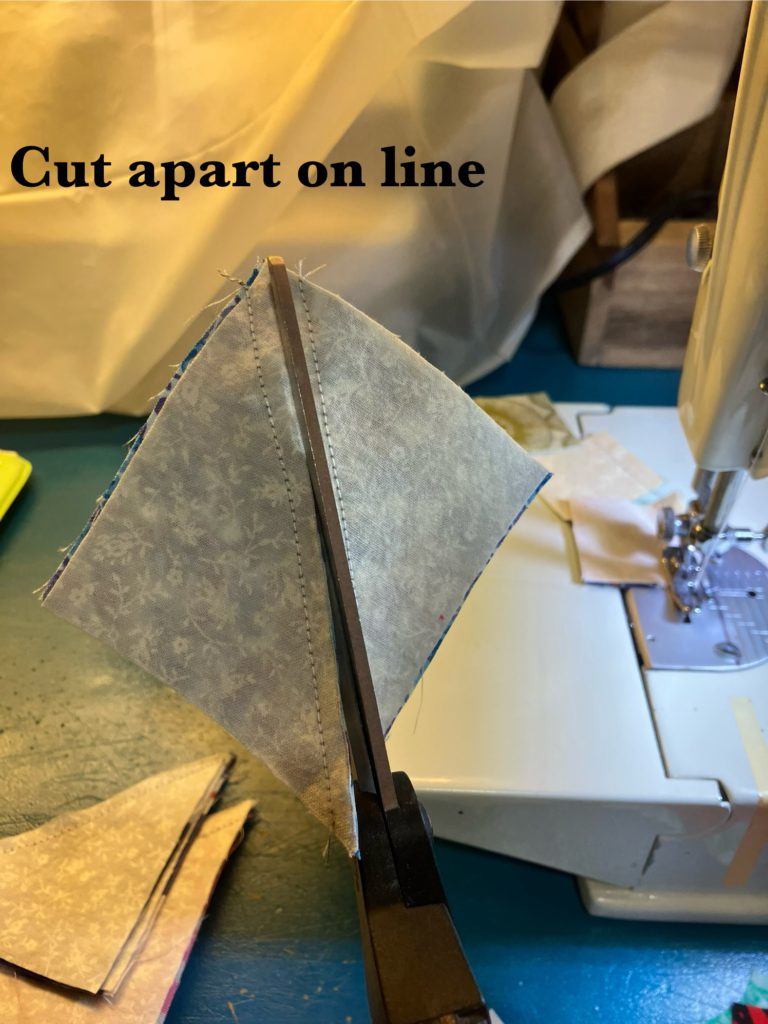
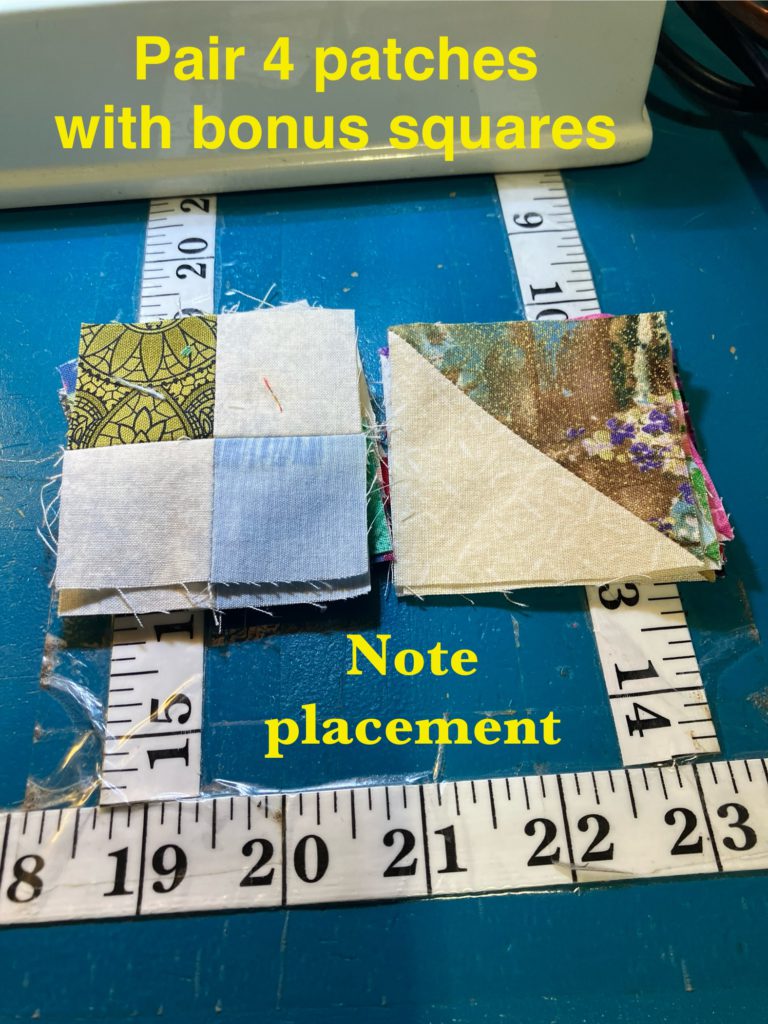
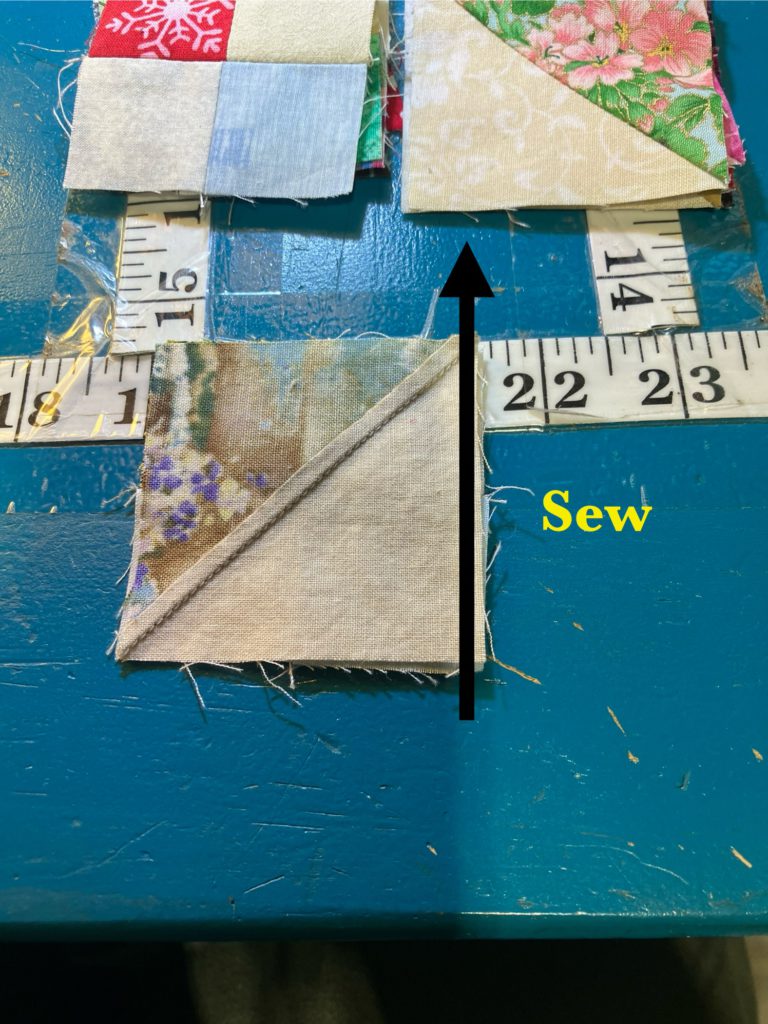
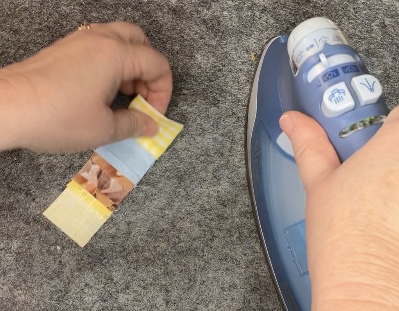
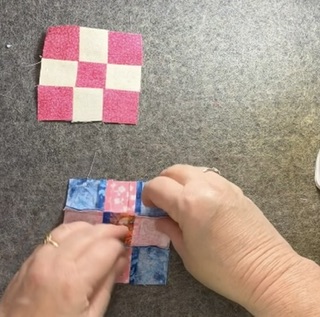
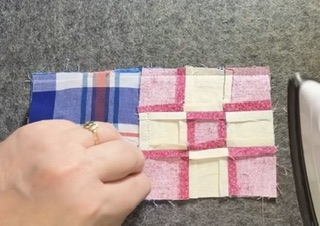
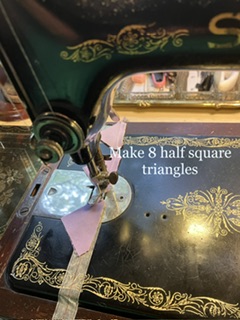
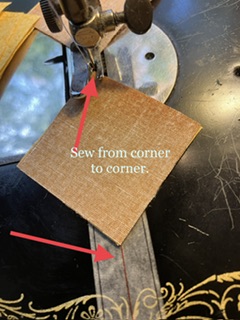
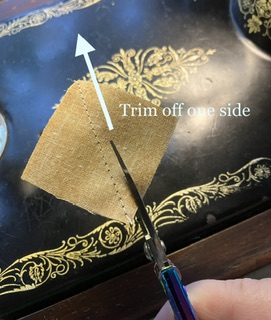
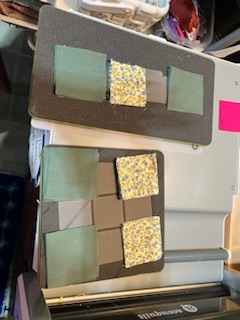
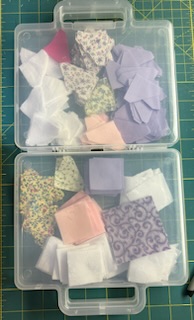
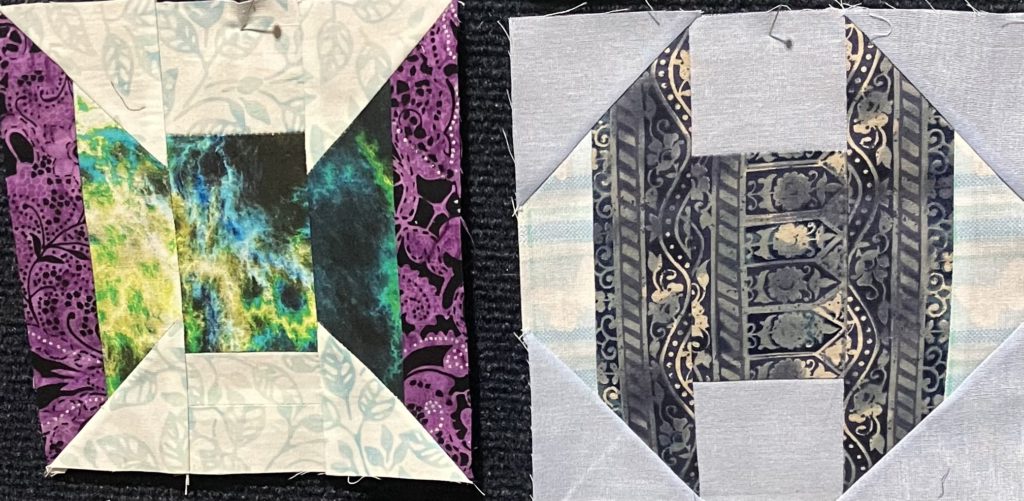
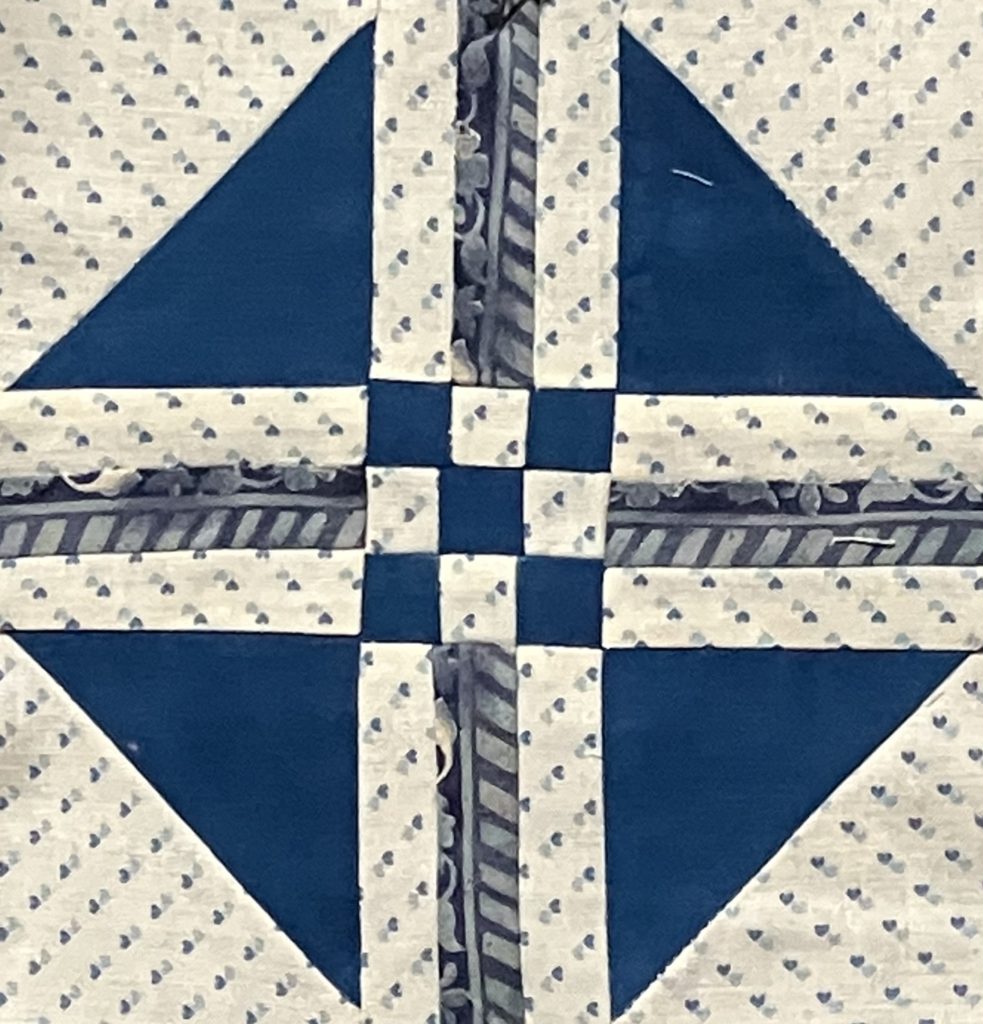
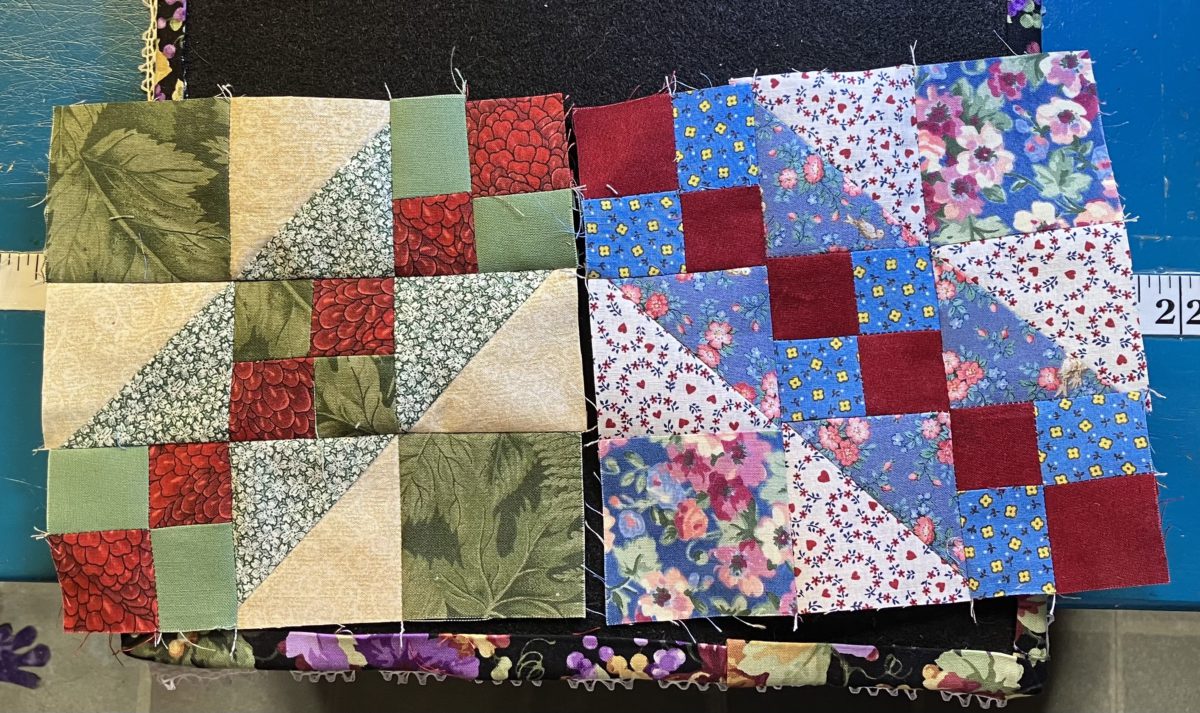
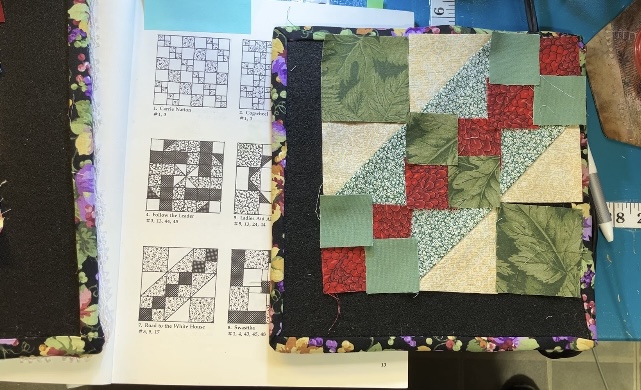
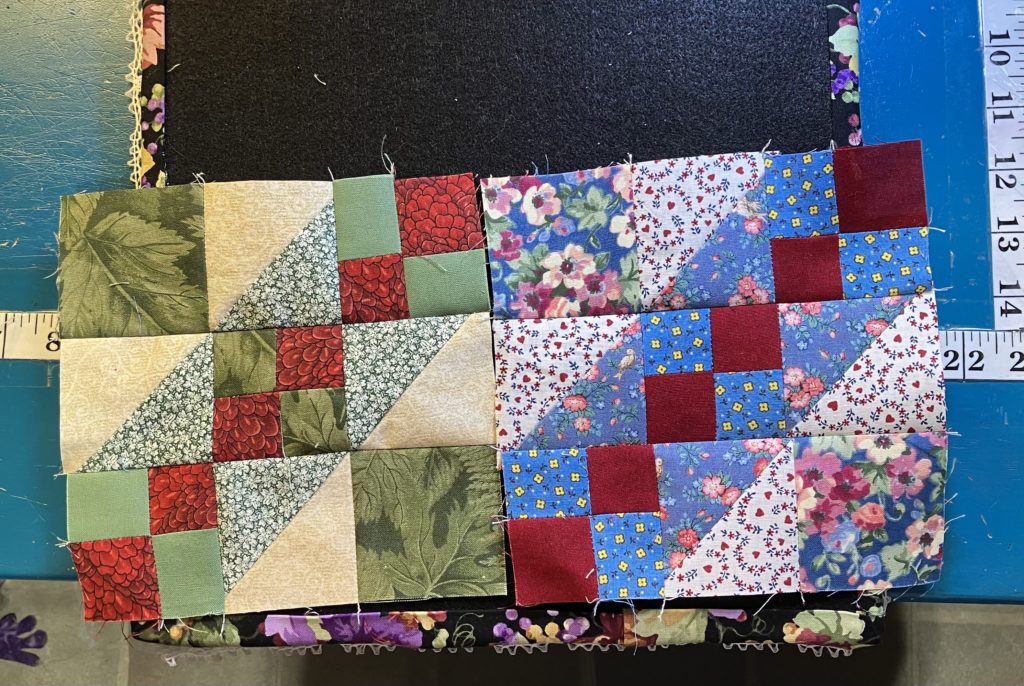
In the video, I take time to play in my fabric scrap bins. I created a blue version and a green version of this block. The bonus half square triangle blocks have been trimmed to the appropriate size. The half square triangles were pressed to the dark fabric before they were trimmed.

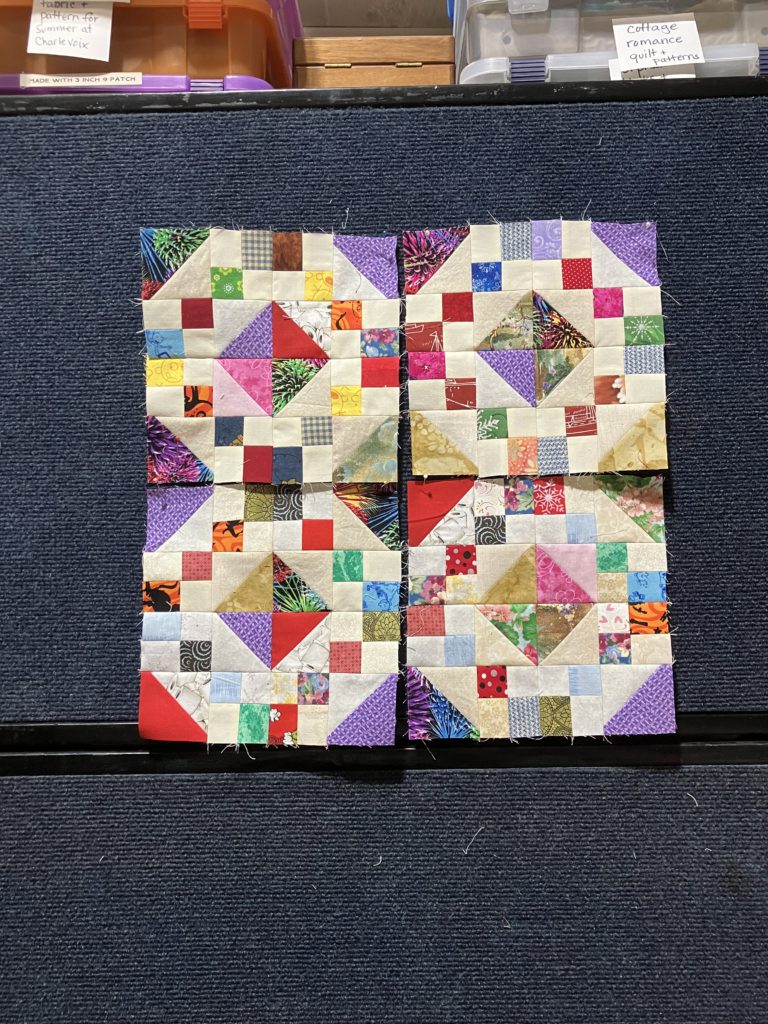
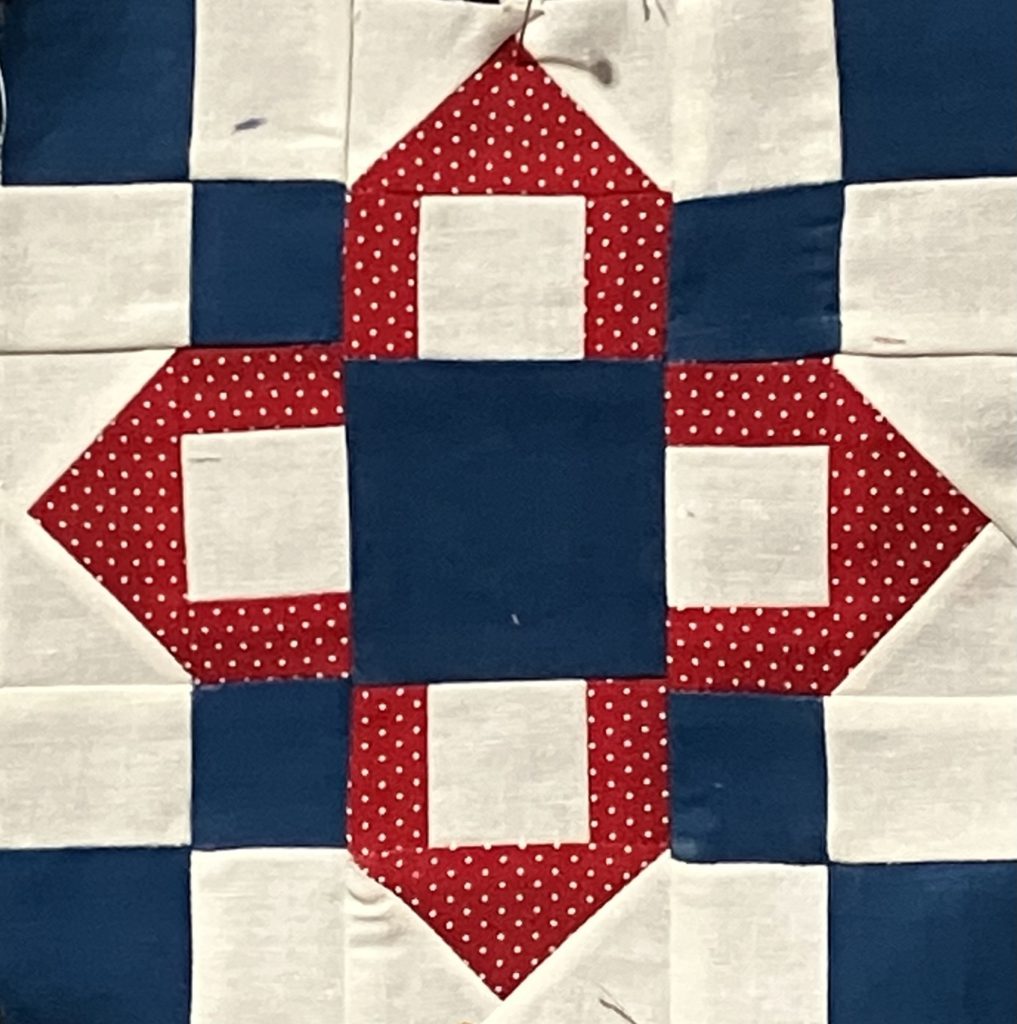
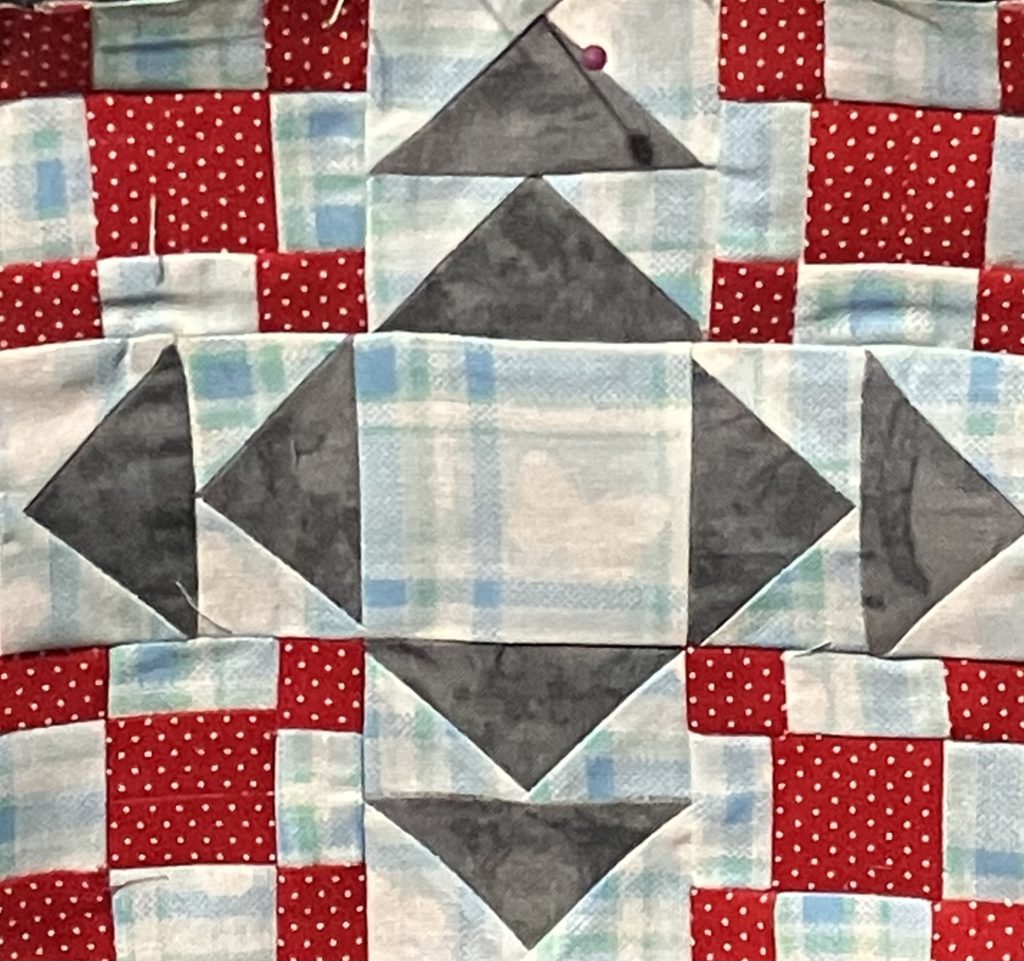
I do like the diagonal movement in this block. This would make a fantastic quilt all by itself. Hmmm!

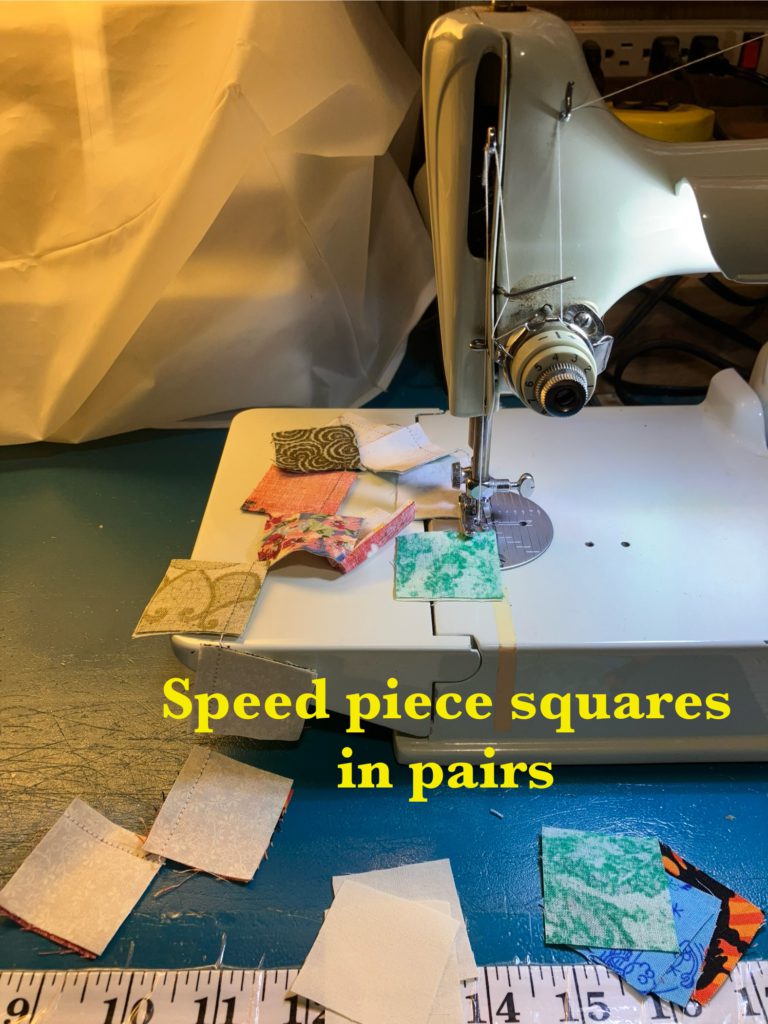
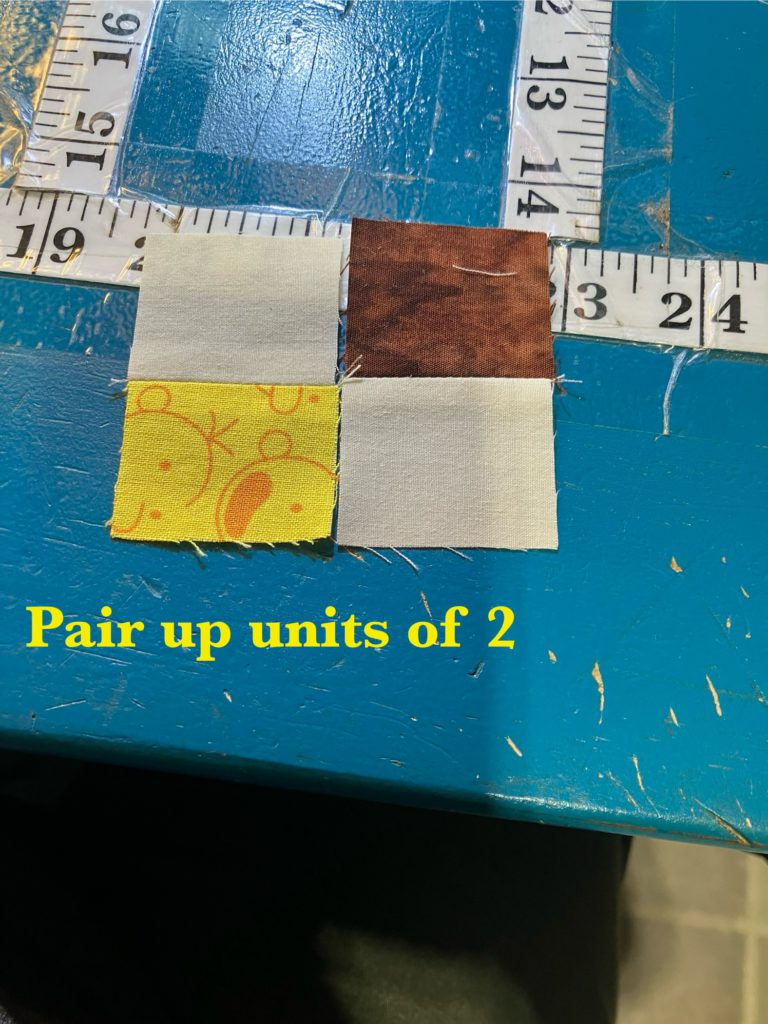
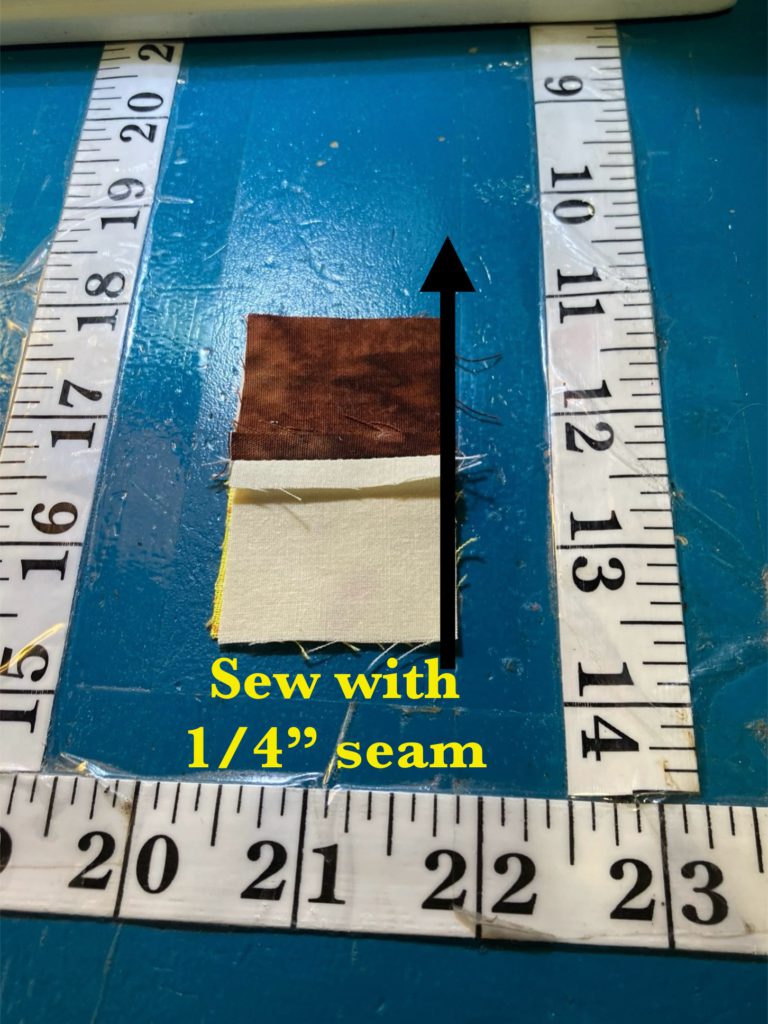
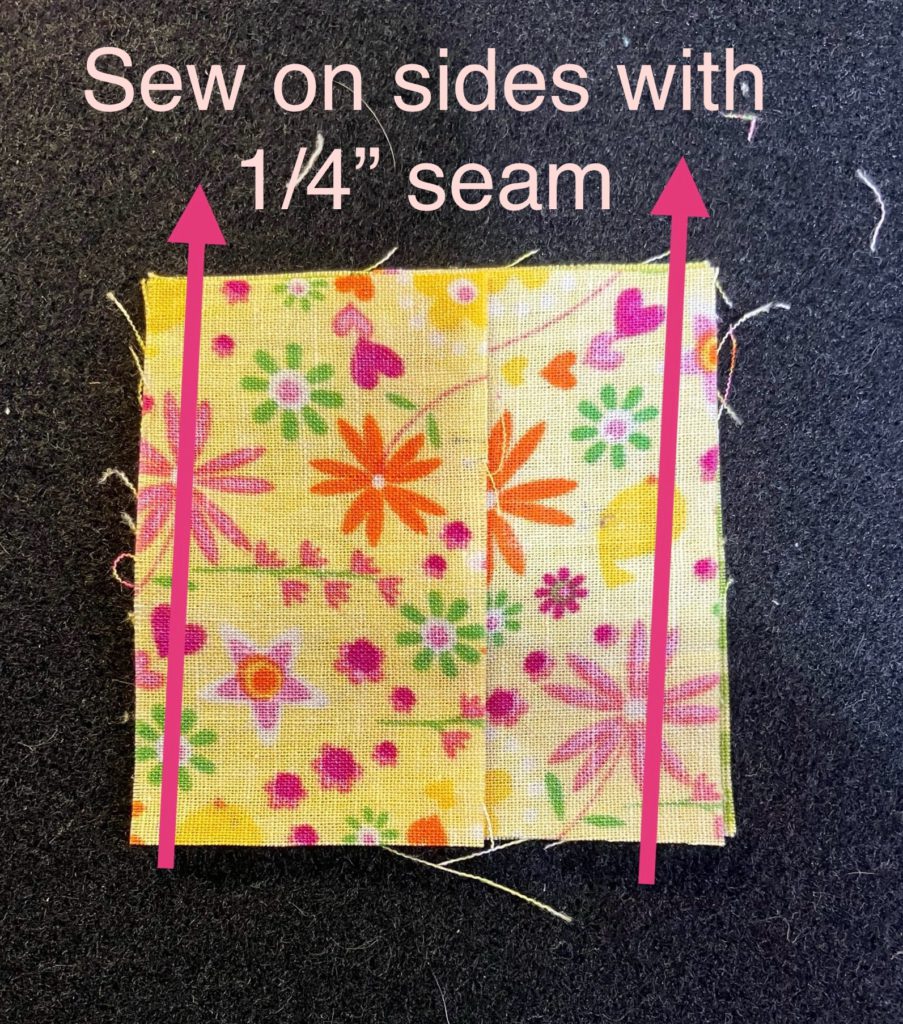
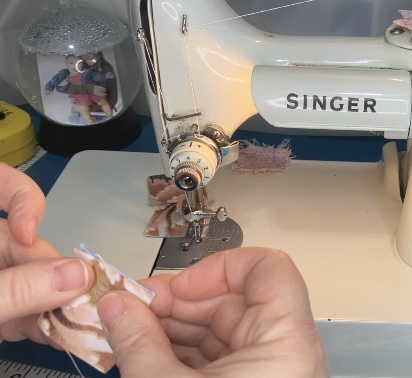
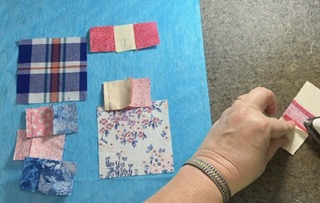
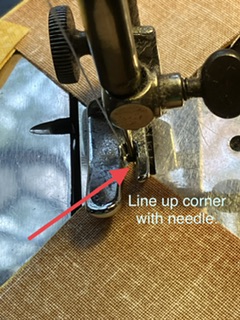
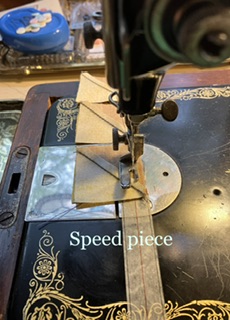
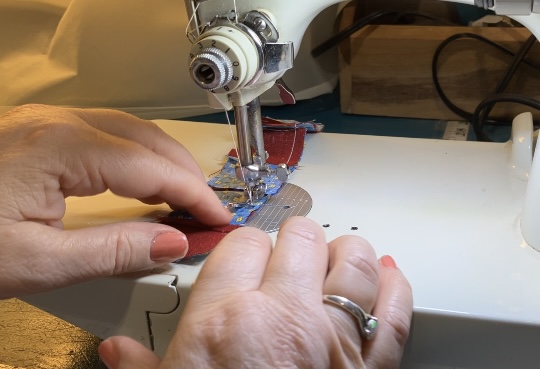
I start by speed piecing those little four patches…zoom, zoom…and away we go sew!

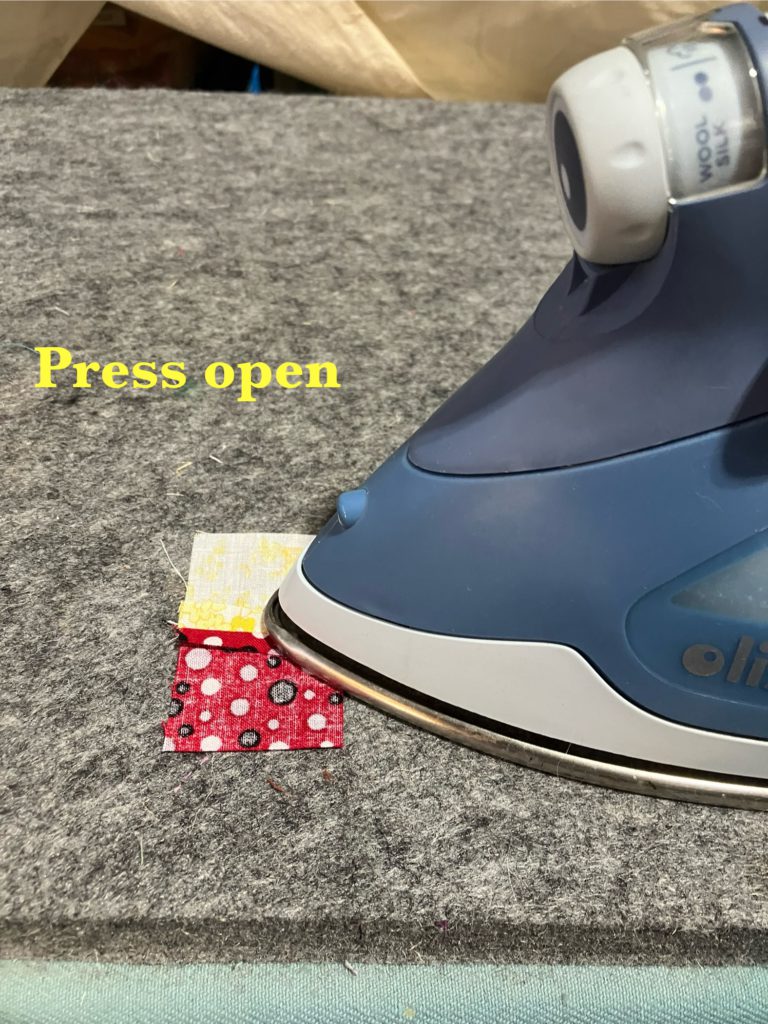
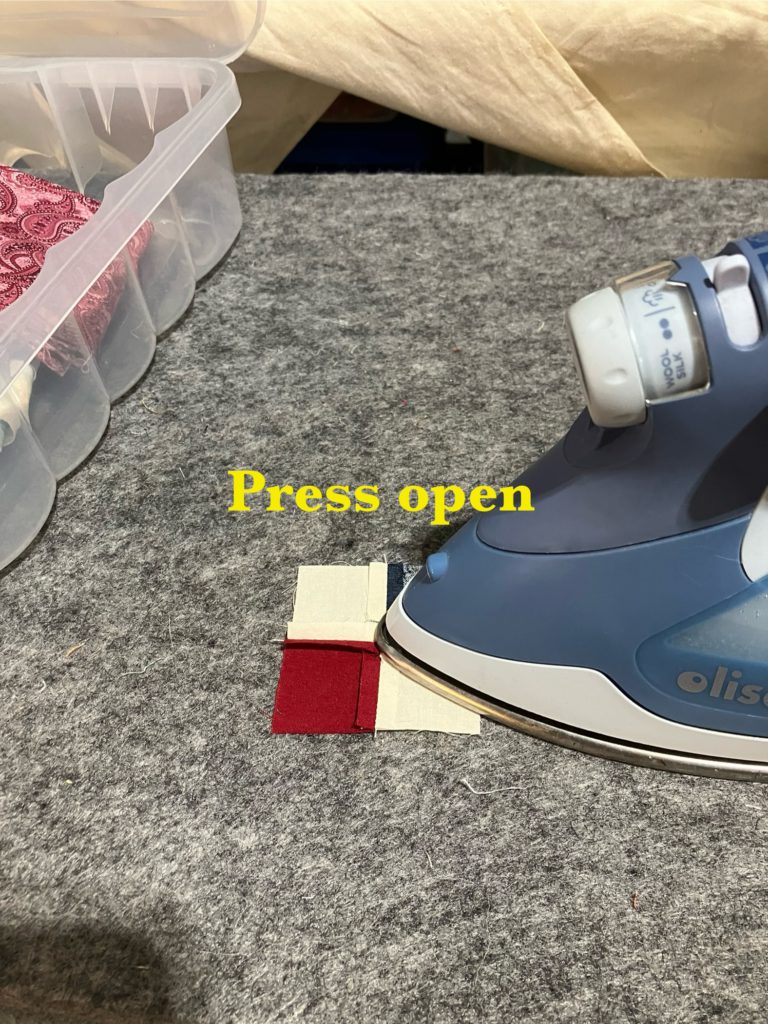
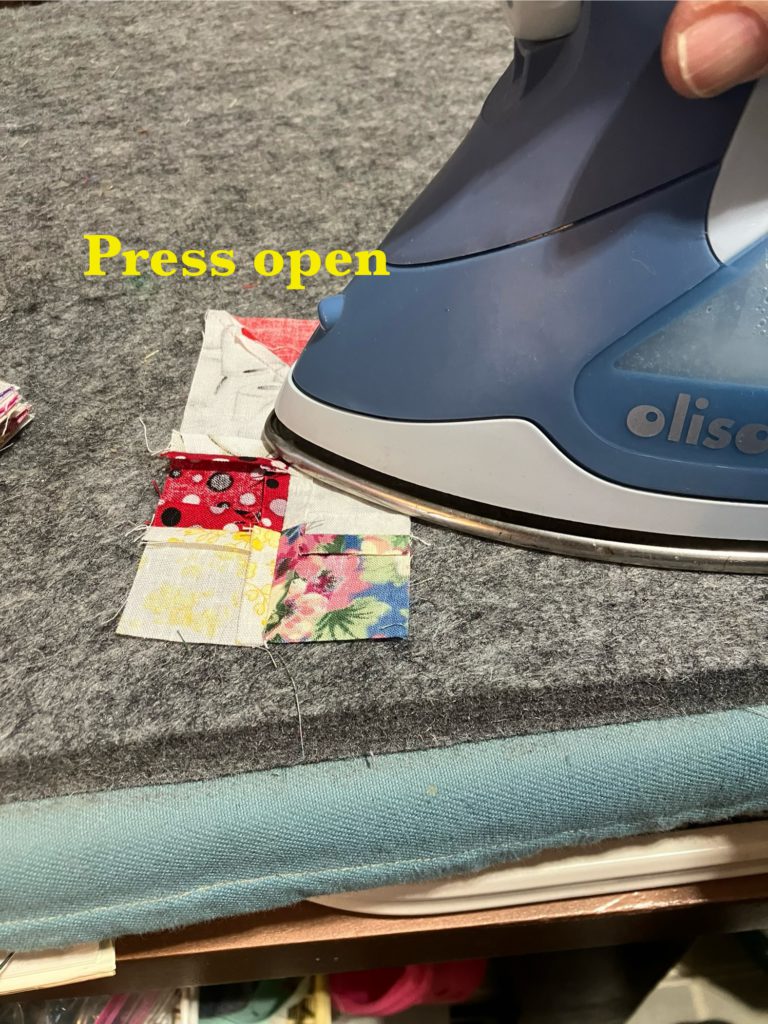
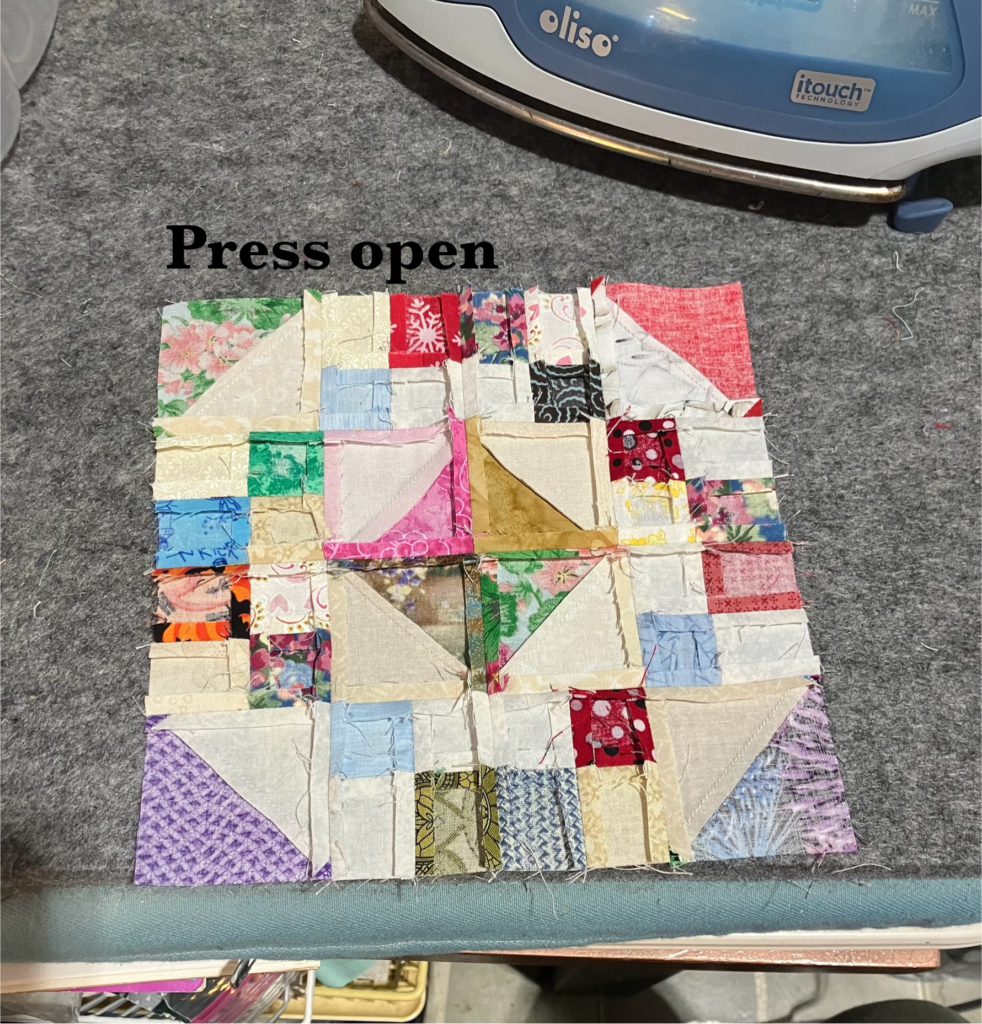
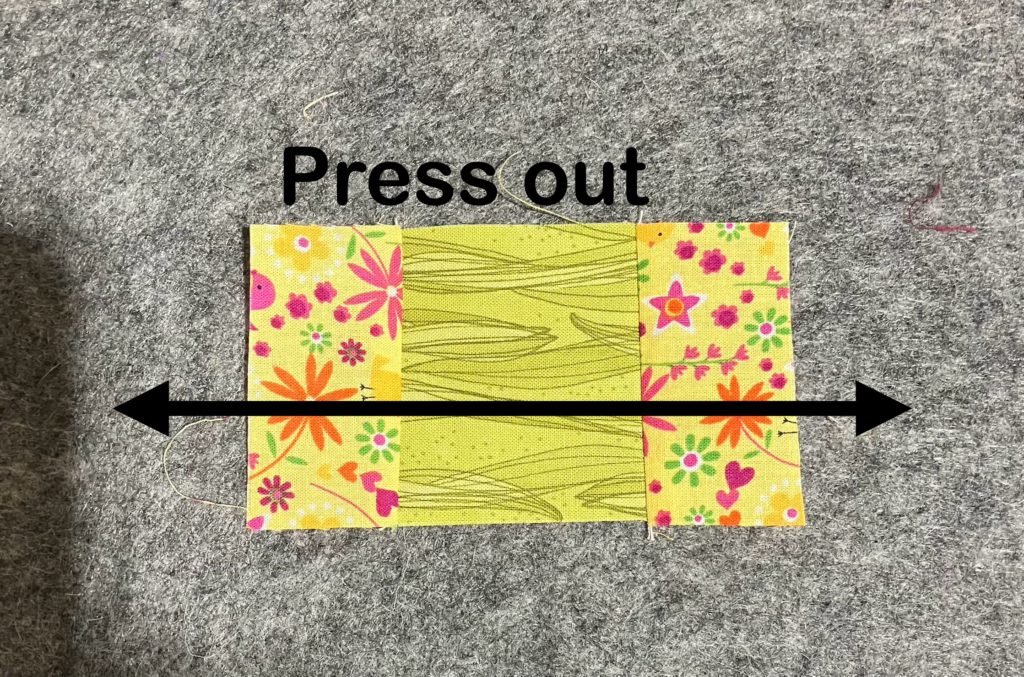
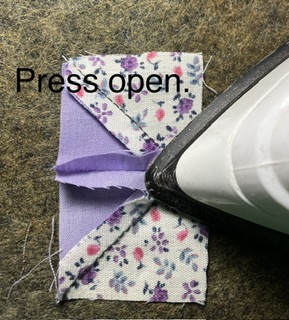
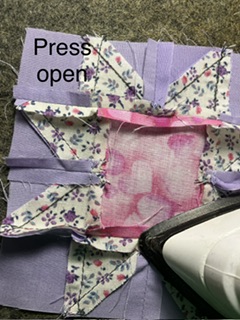
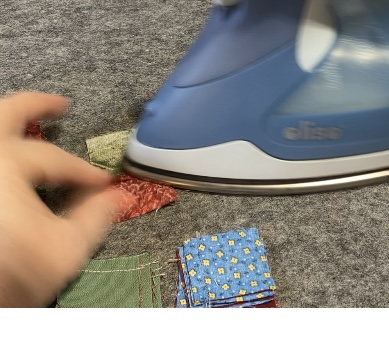
I press the four patches open to reduce bulk. If I were making one of the larger versions of this block, I would probably press to one side or the other. Life is full of decisions…don’t spend too much time on this one.

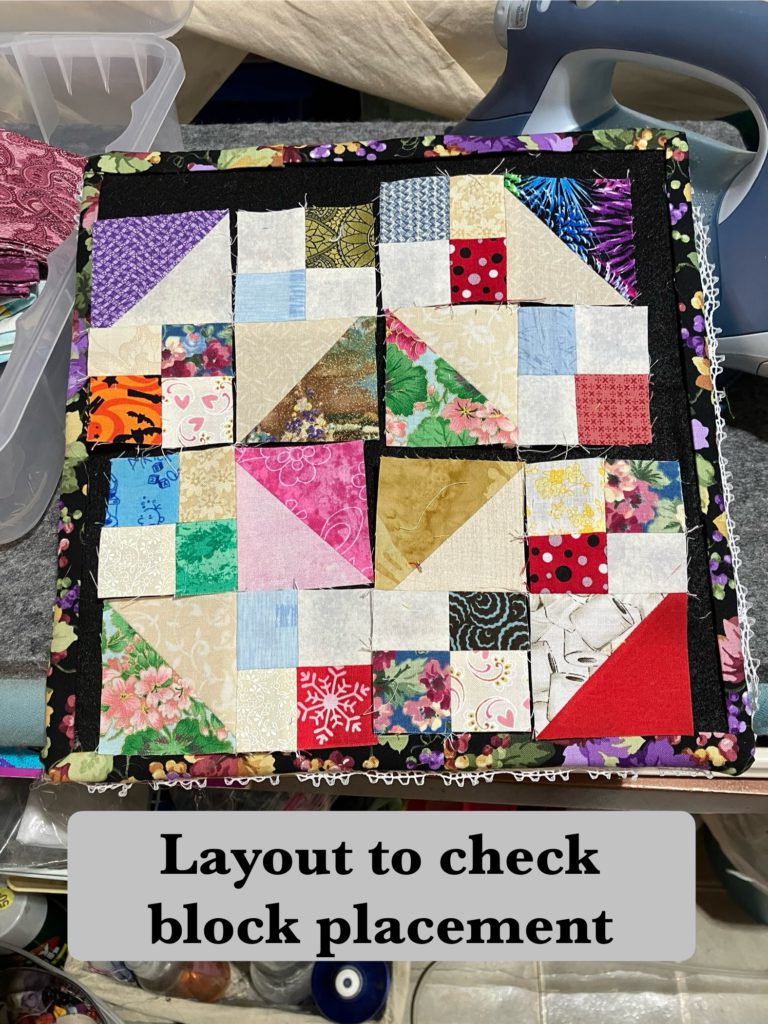
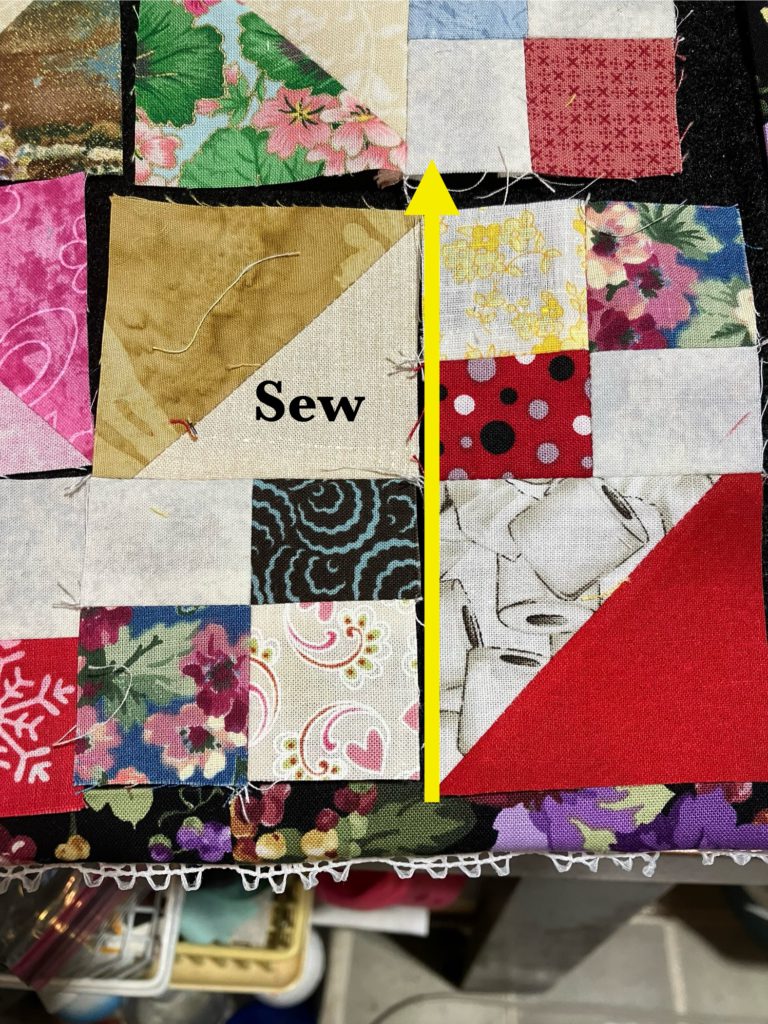
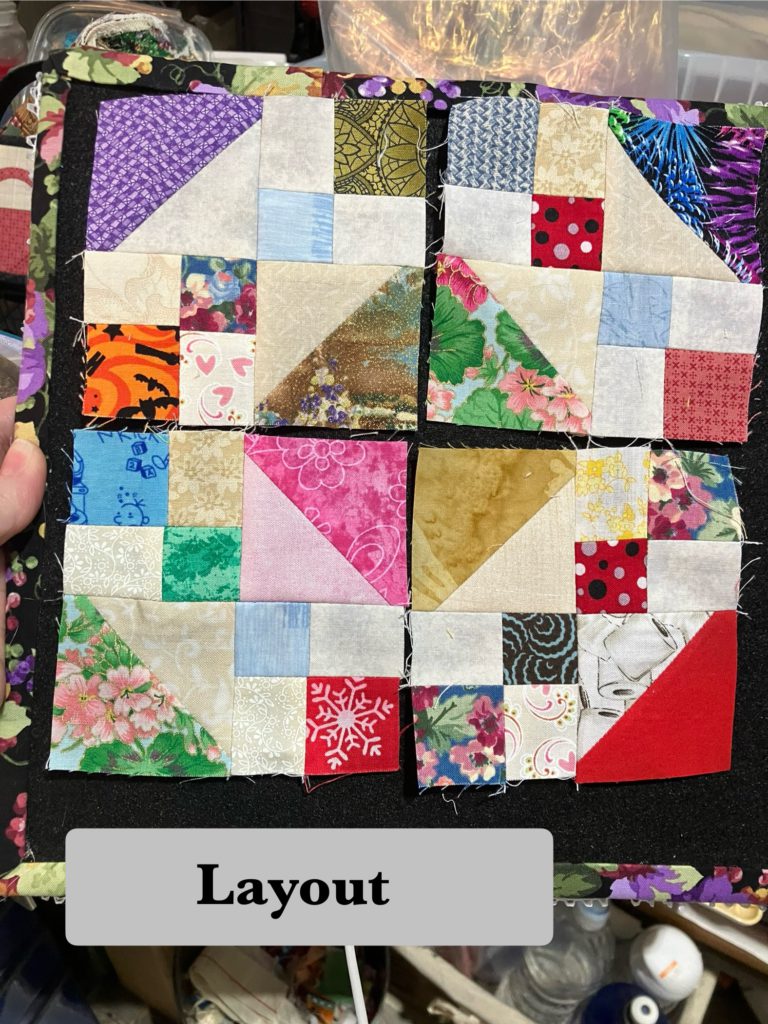
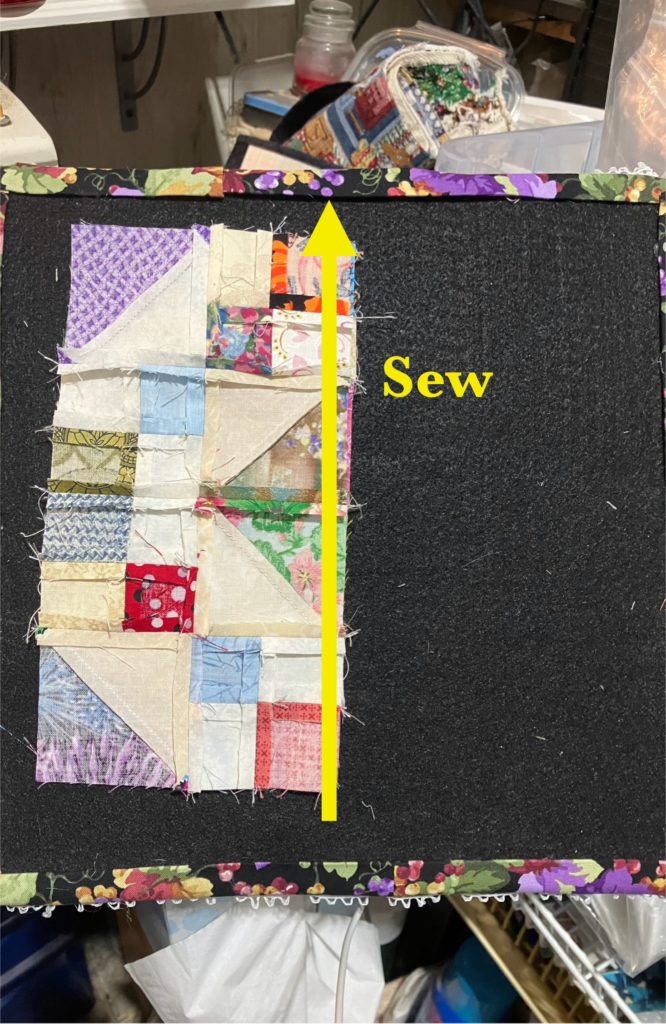
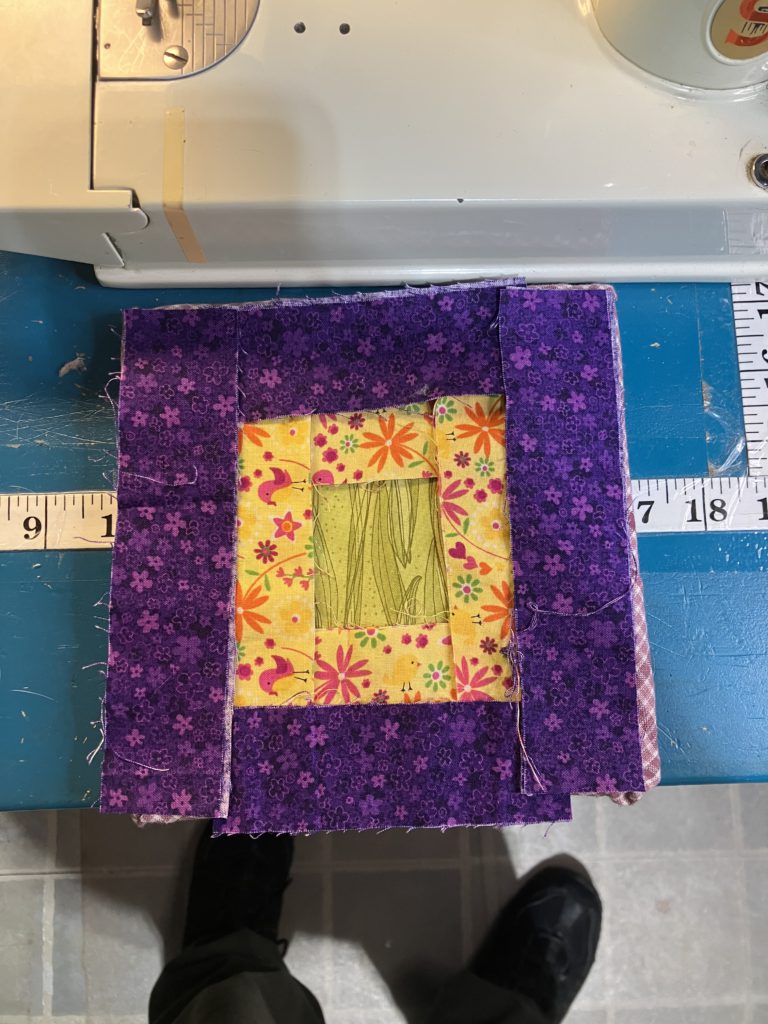
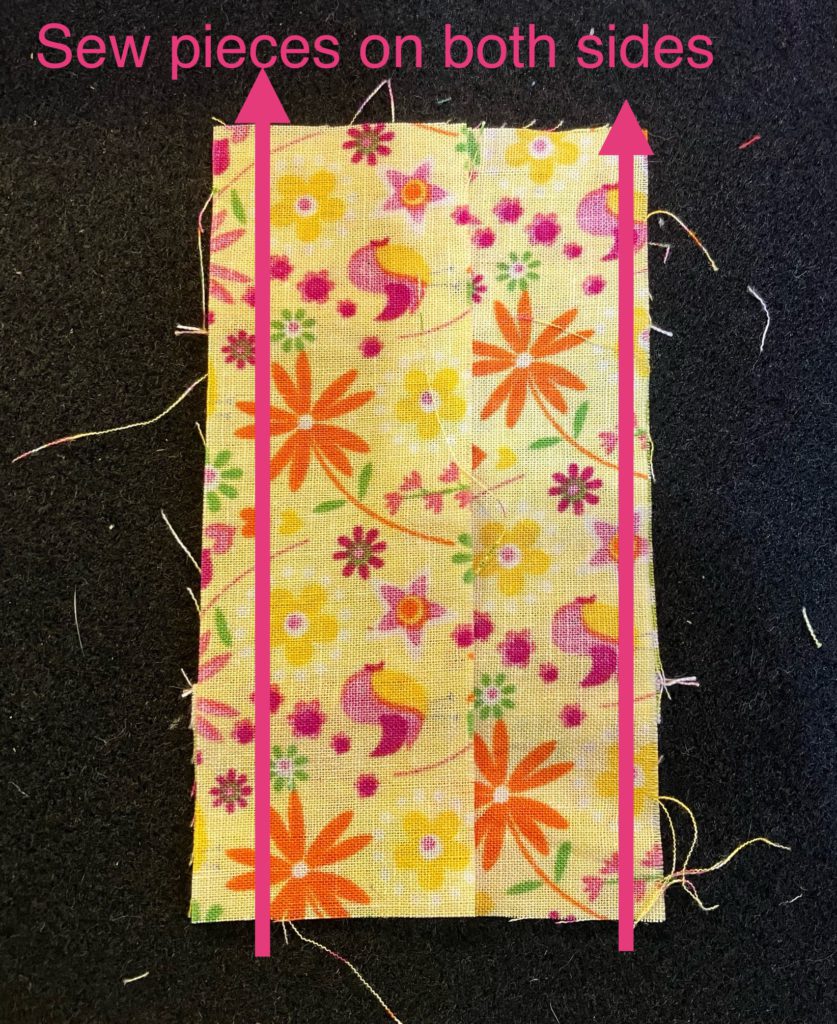
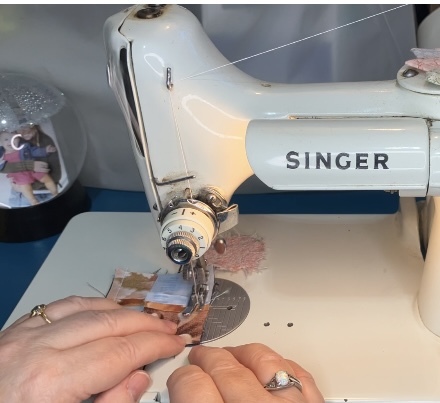
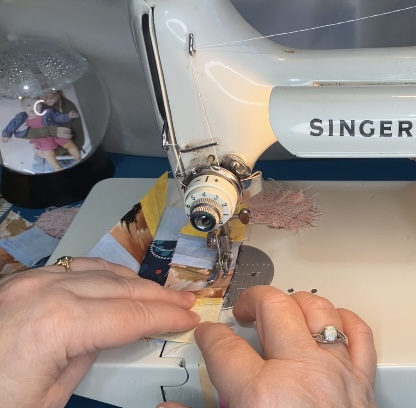
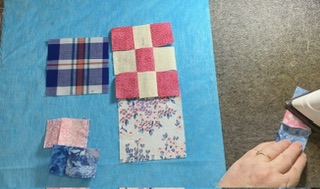
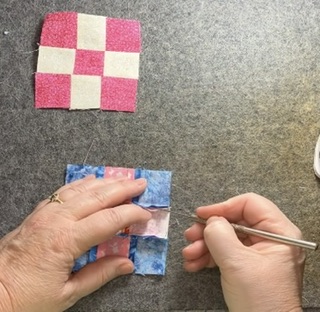
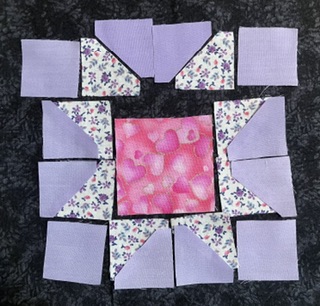
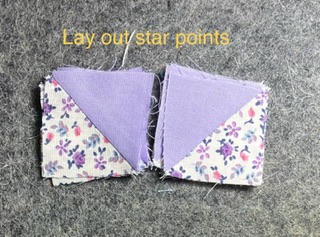
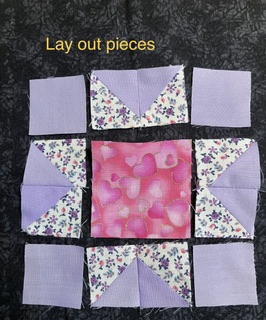
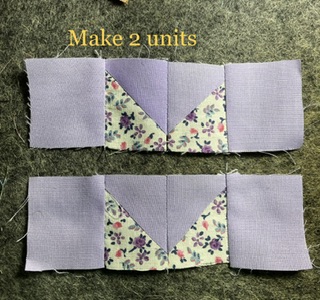
At this point, some people like to “web sew” the block together. I seem to get tangled and frustrated with the joined threads, so I repeatedly lay the block out on a design board so I don’t make mistakes. (Unfortunately, I still make mistakes. I have become very proficient with a seam ripper!)

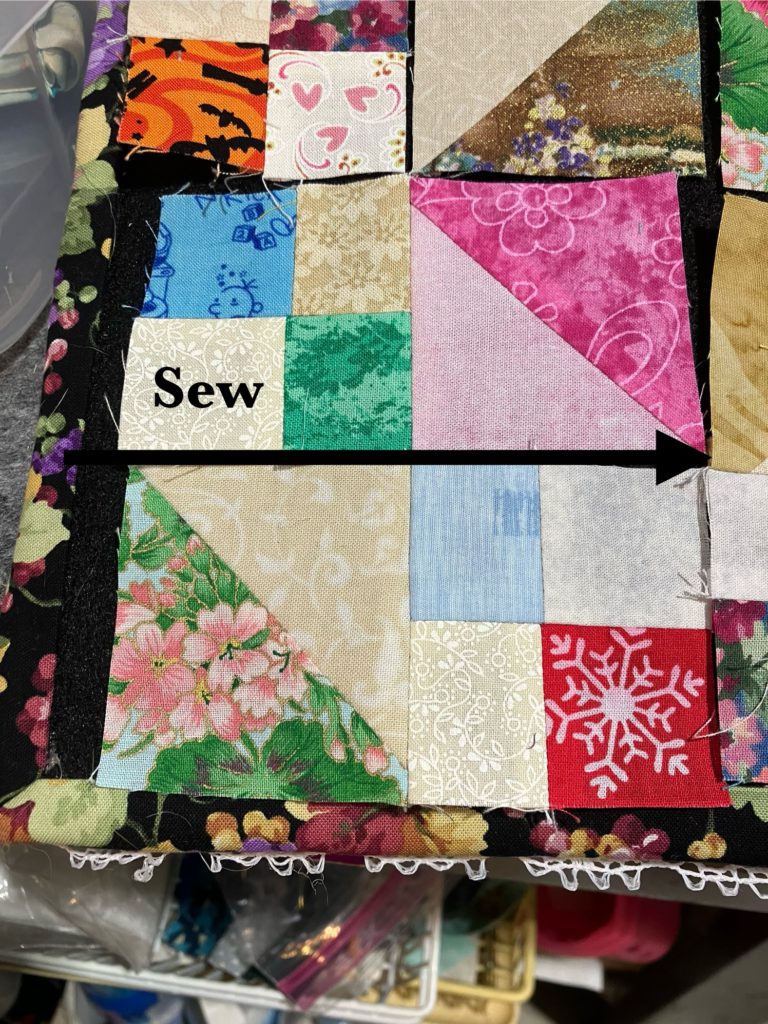
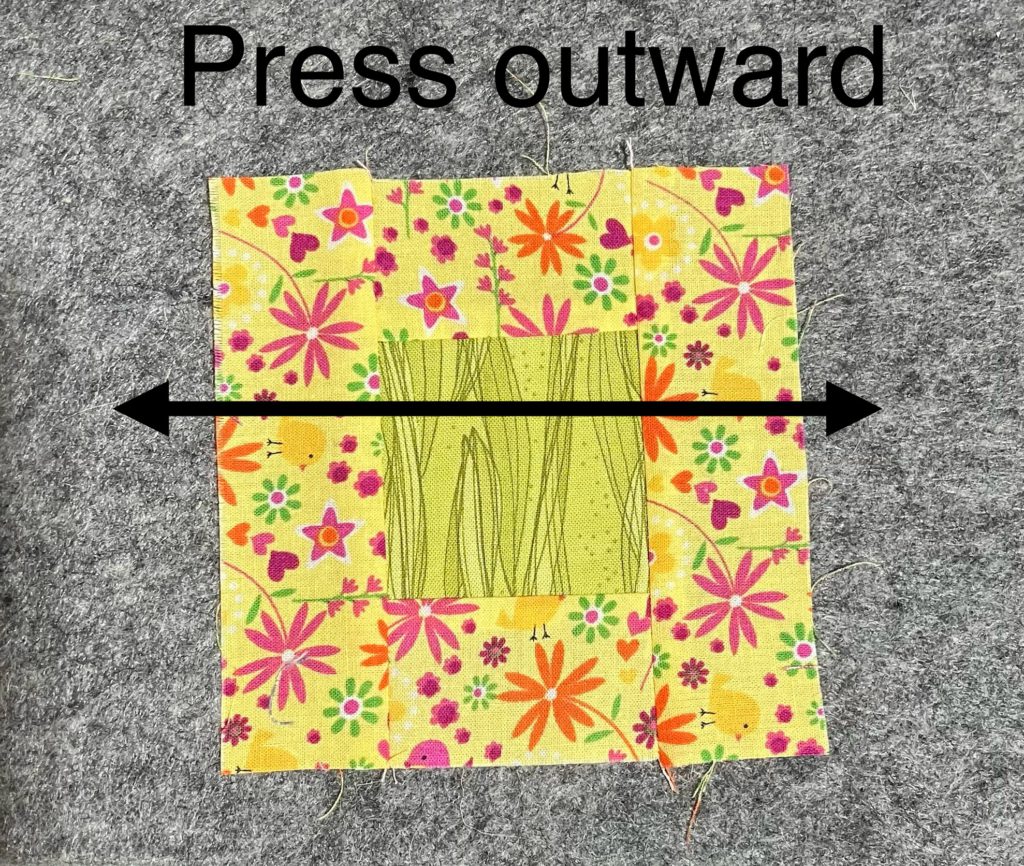
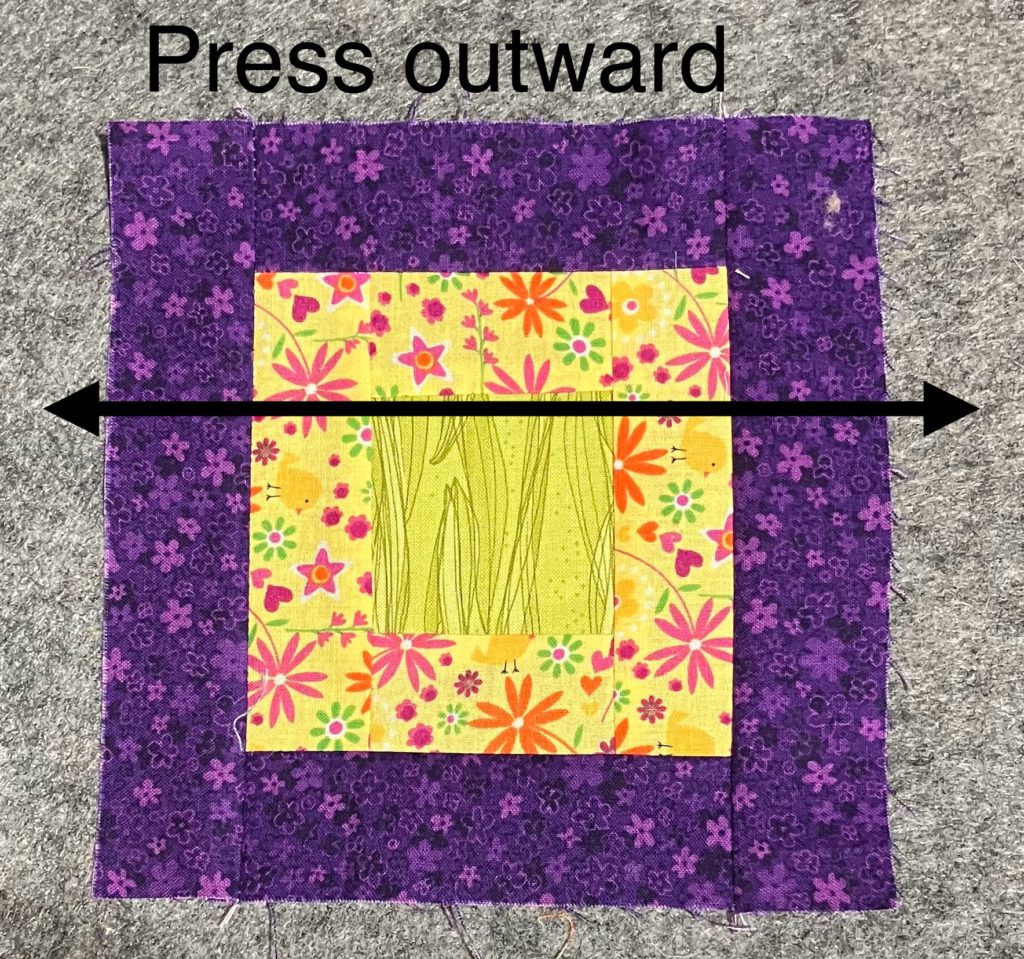
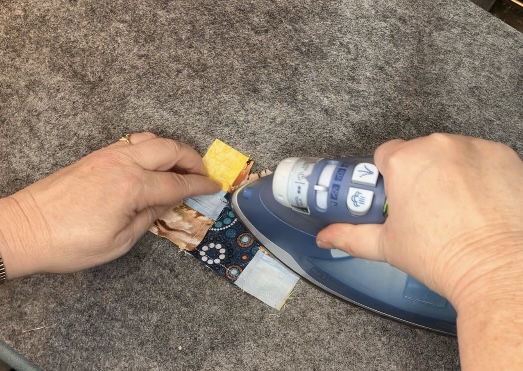
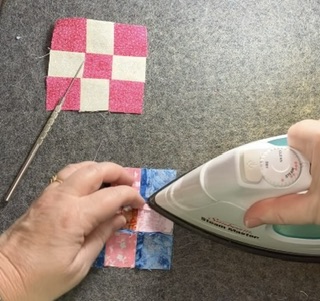
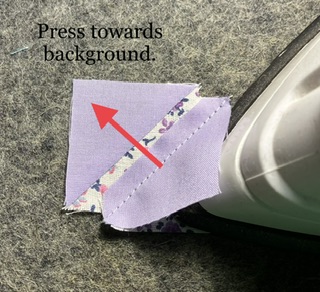
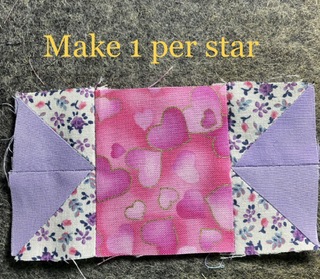
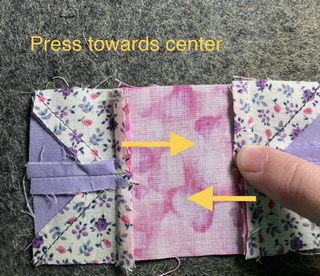
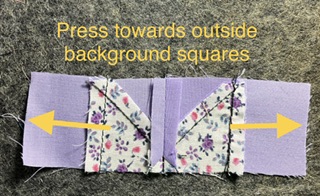
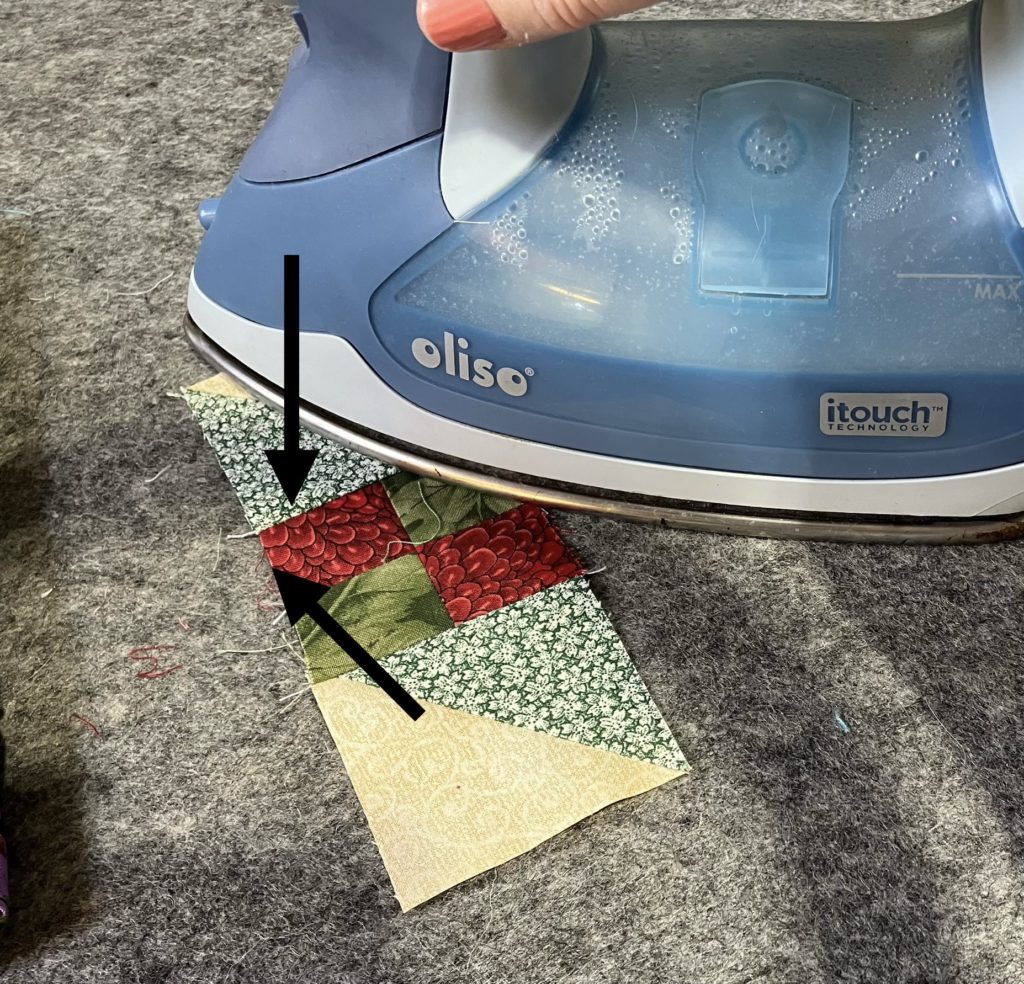
I press towards the four patches and plain squares. Pressing open is an option, too. See my illustrations below. (The arrows would not cooperate when I was editing the next picture…and I had had enough fun that day!)

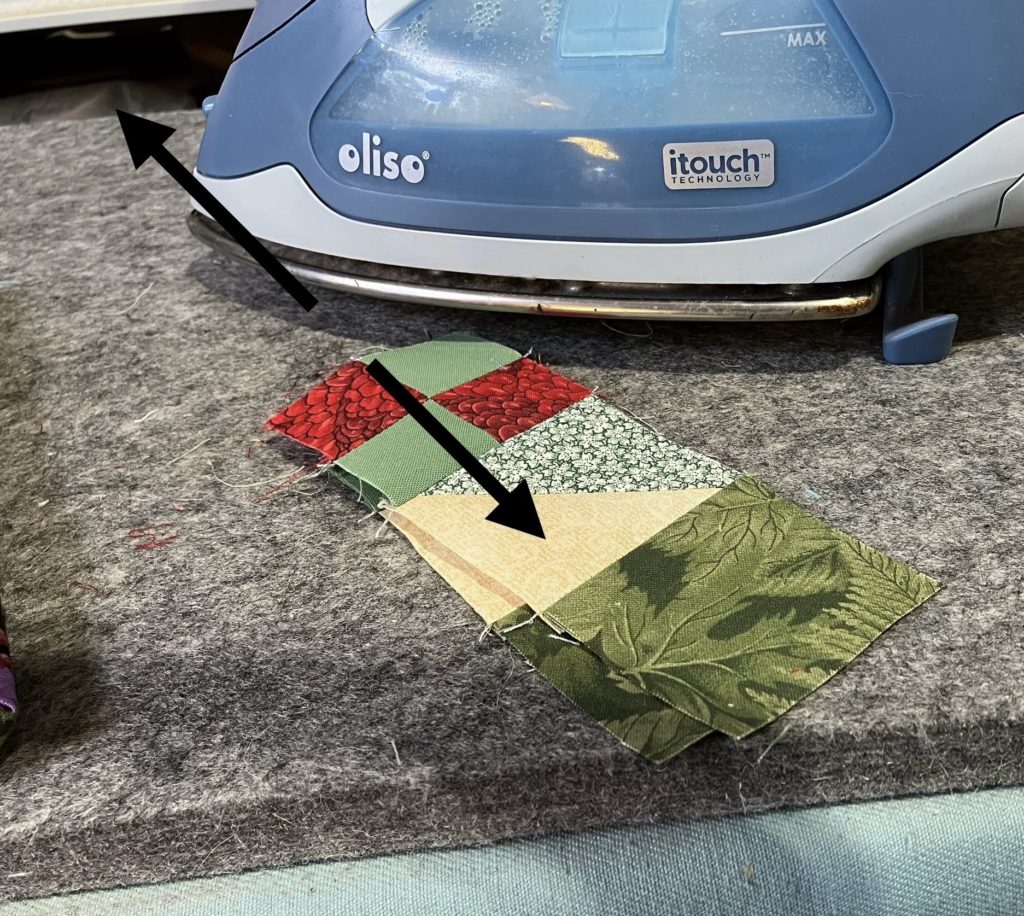
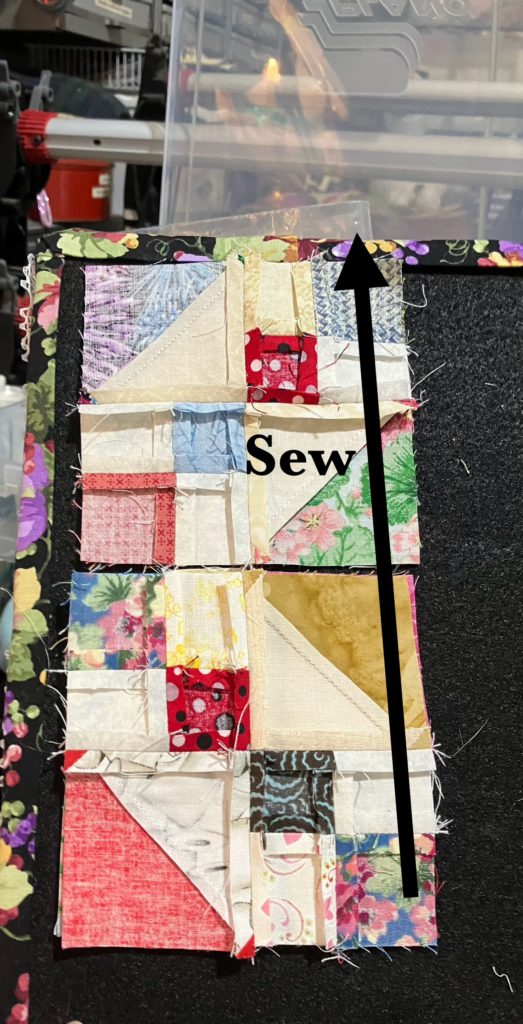
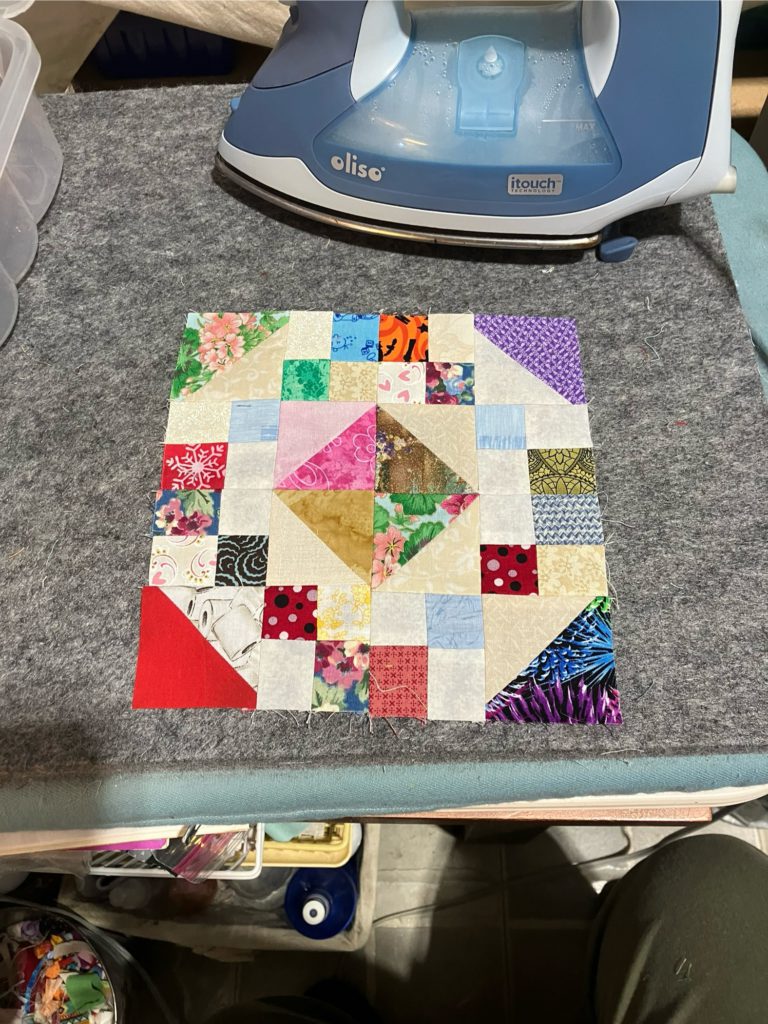
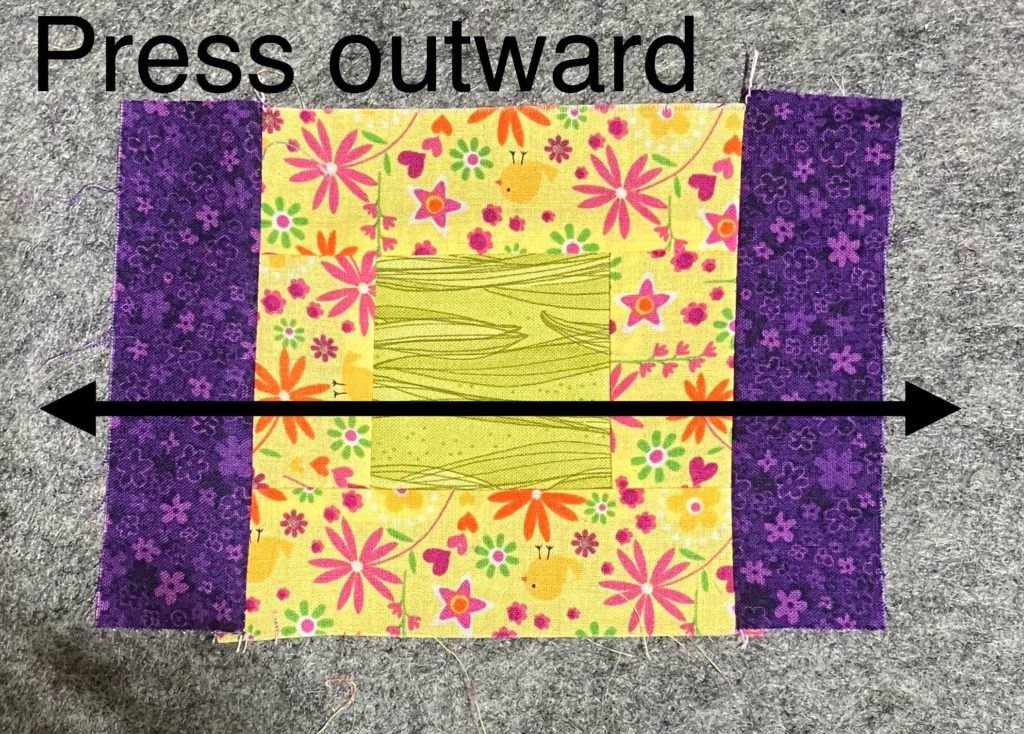
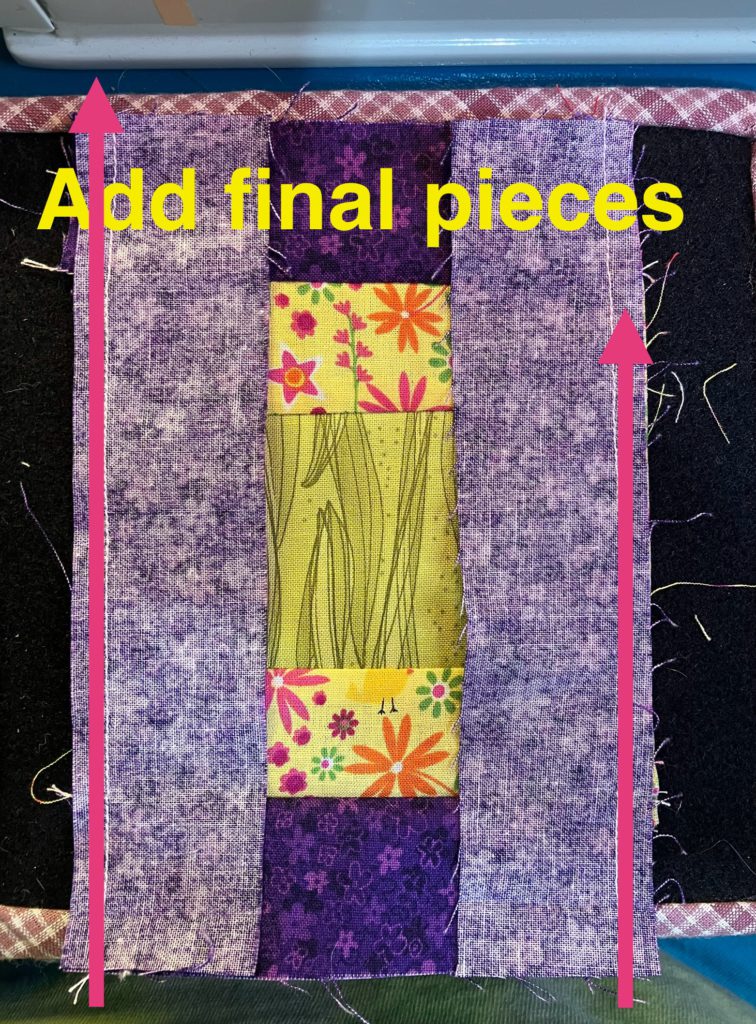
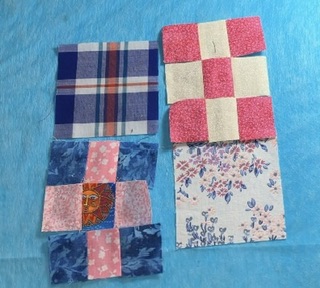
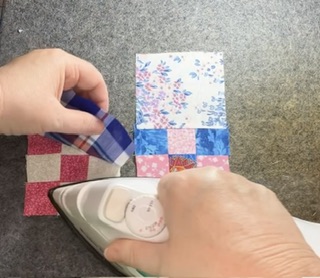
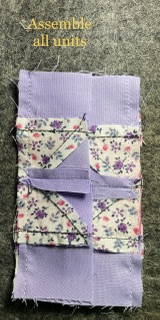
If you pressed towards the 4 patches and/or the solid blocks, your seams will nest nicely as you finish assembling this block. Almost completed…just assemble the rows.

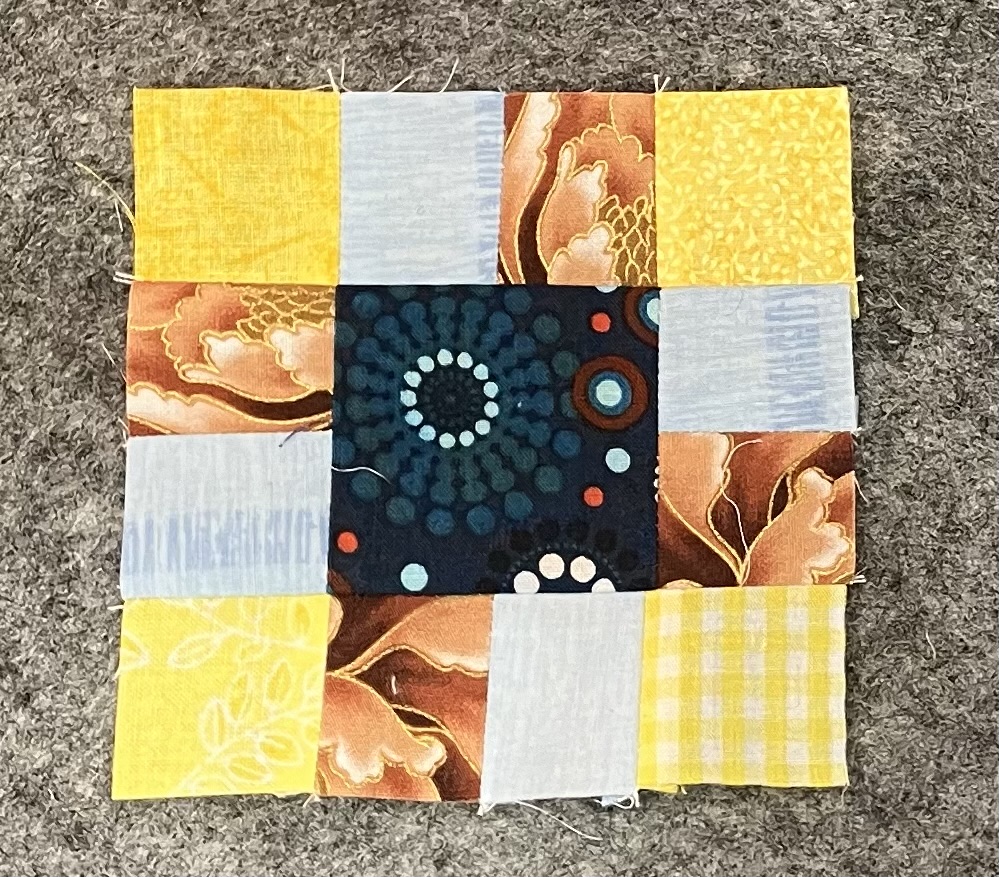
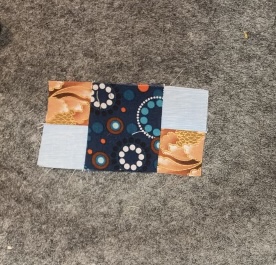
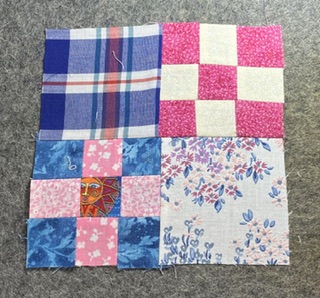
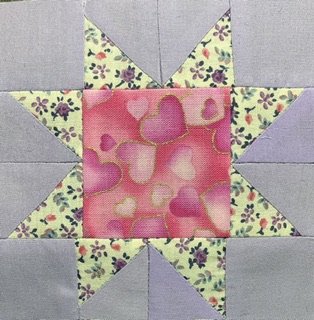
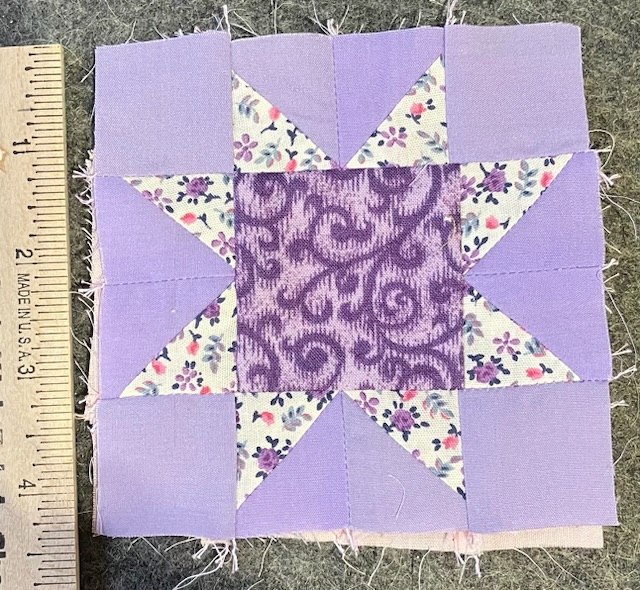
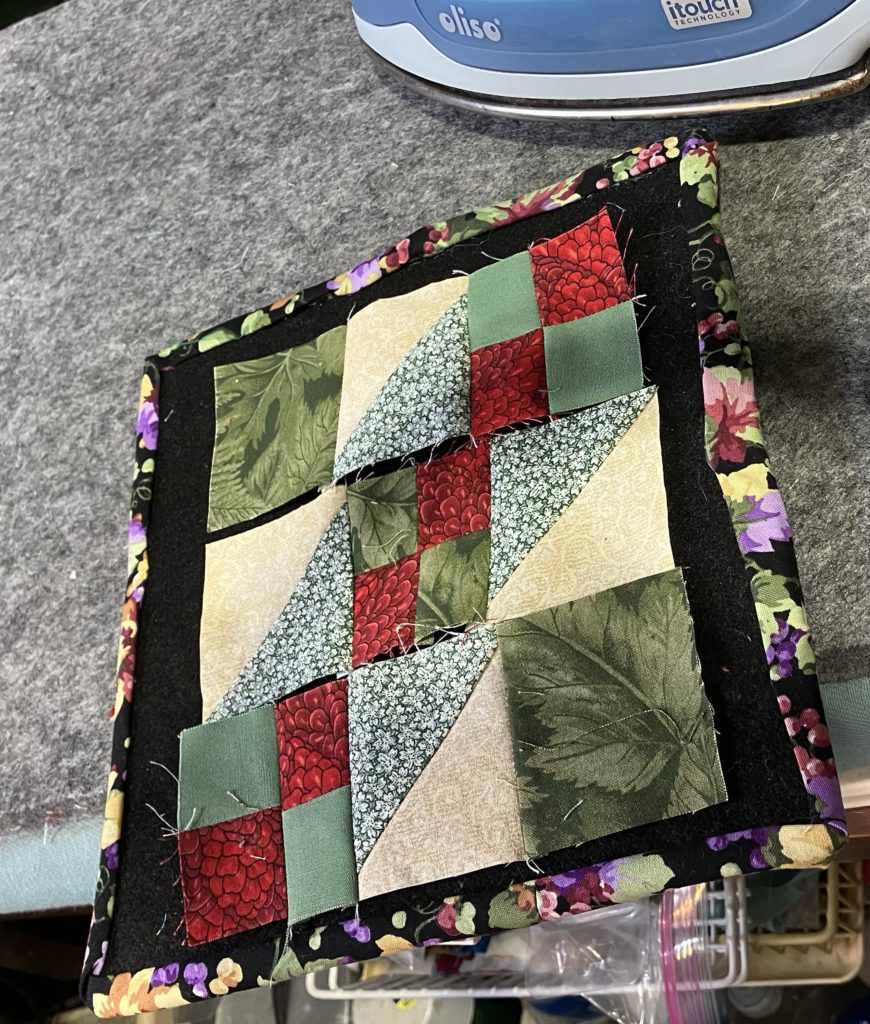
Ta-dah! Ta-done! It was that easy!

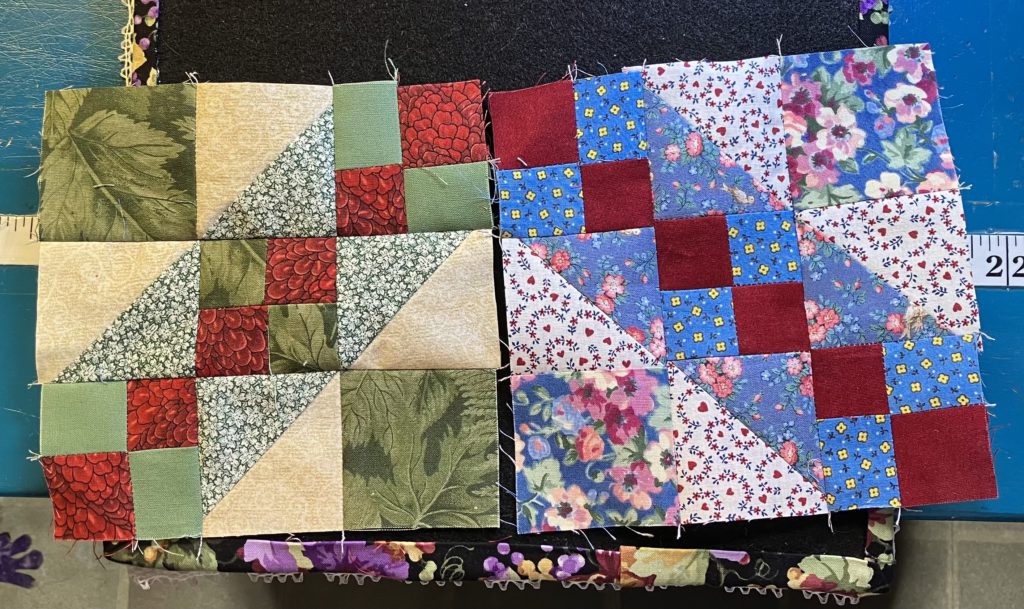
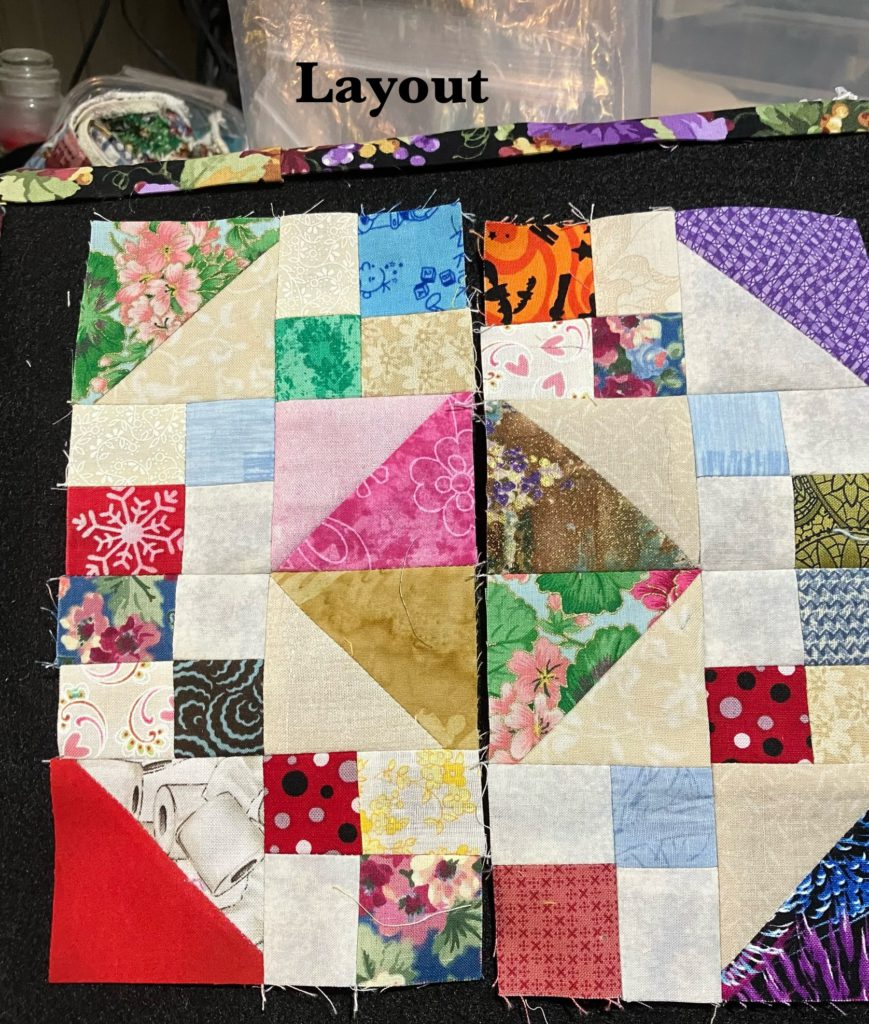
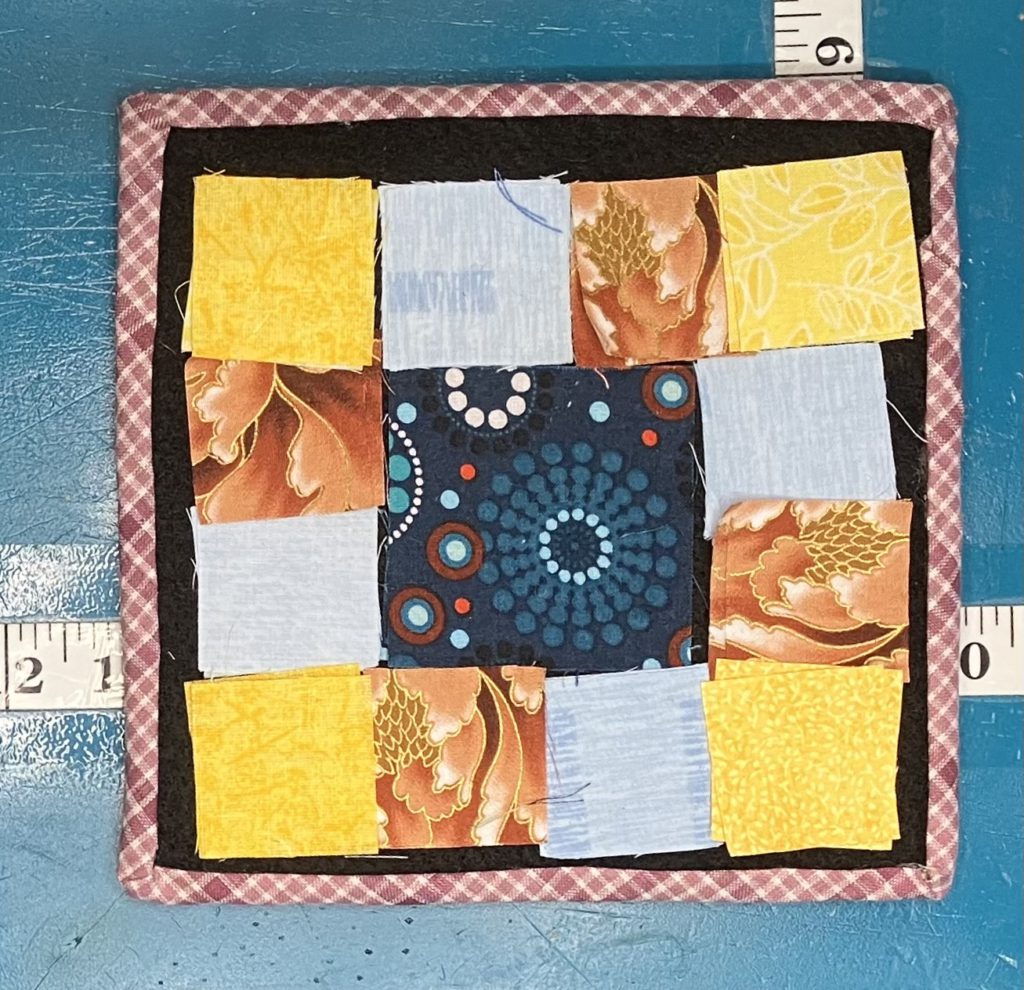
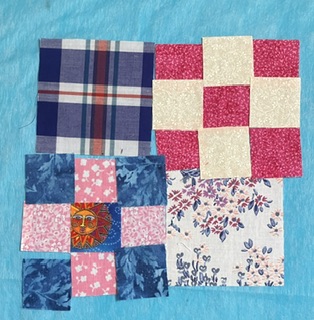
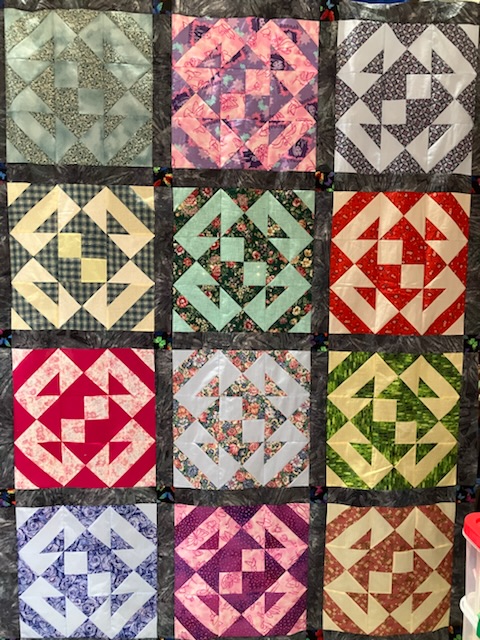
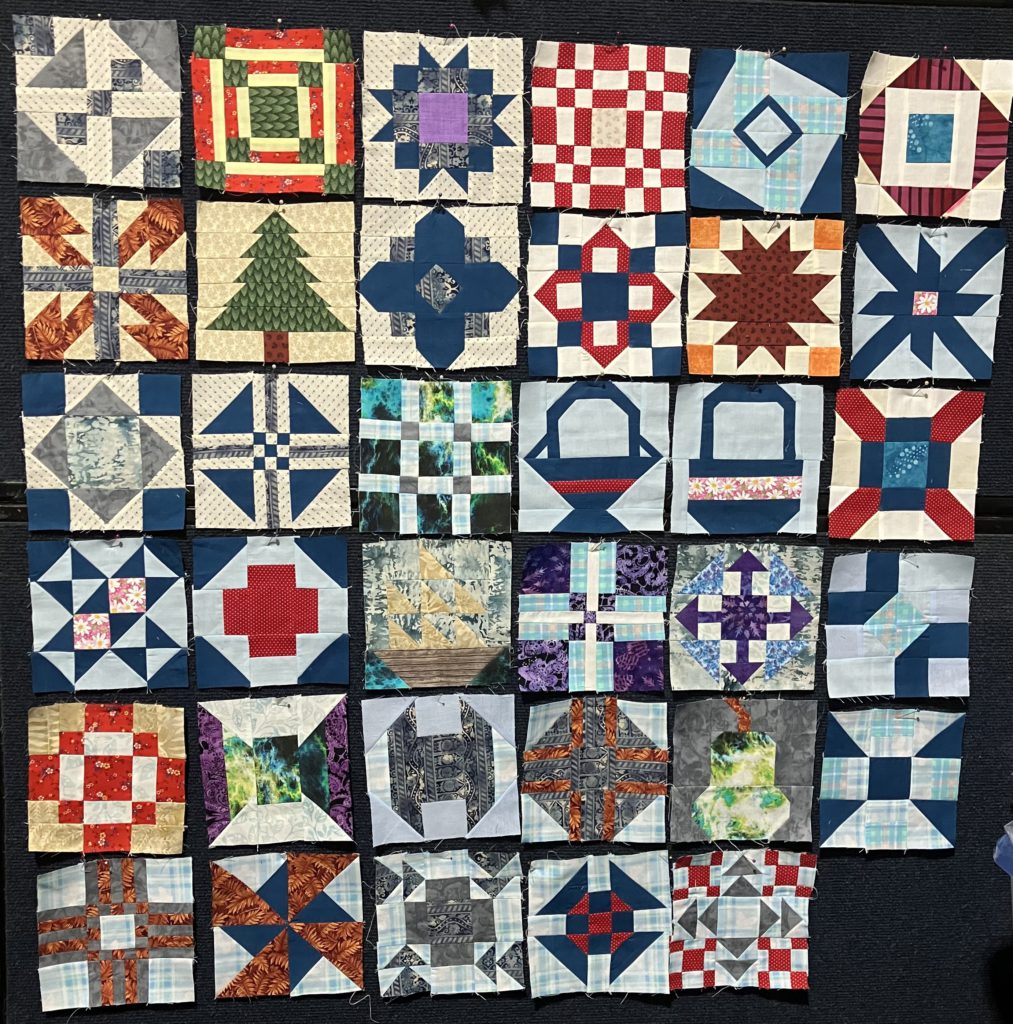
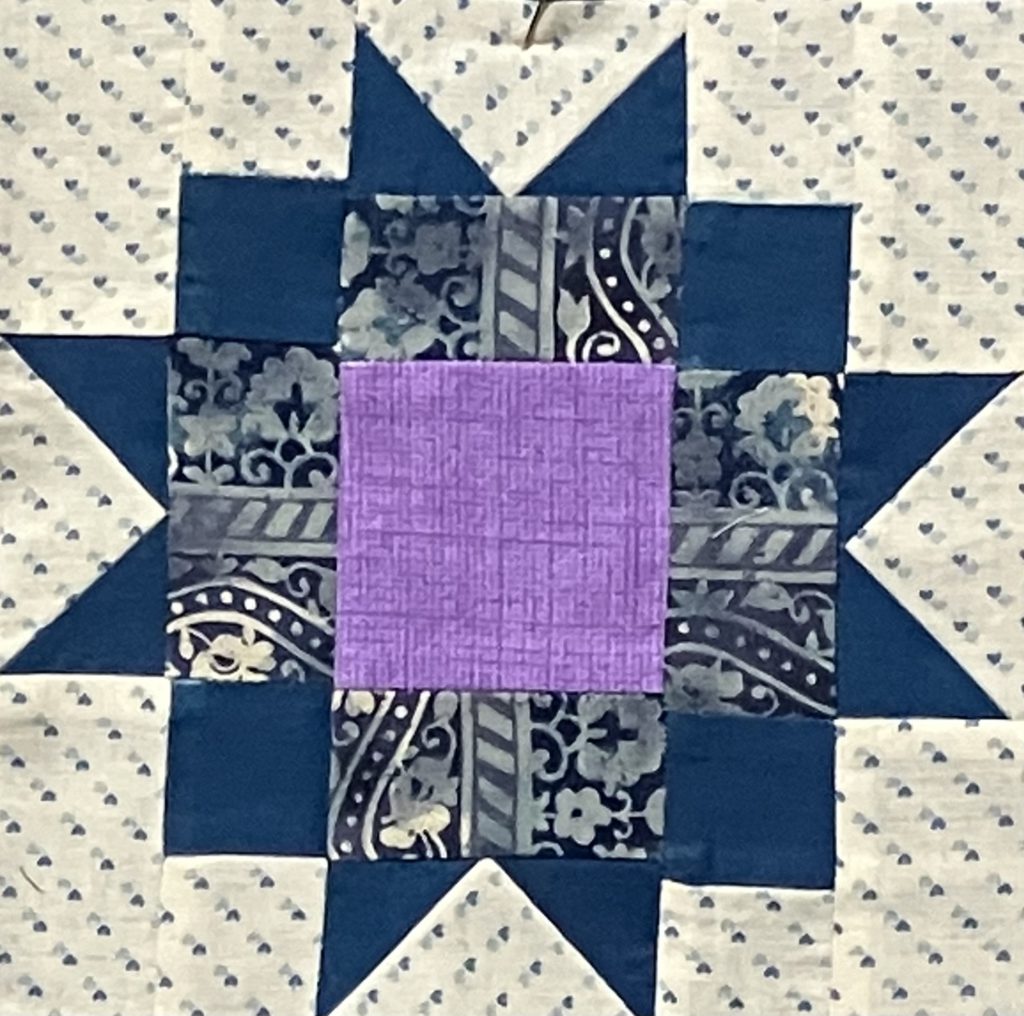
Here’s another possible layout. There are many ways you could layout a set of these blocks to make a beautiful quilt.

Here is the cutting chart for additional sizes of this block. If I were making an entire quilt, I would probably go for the 12 1/2″ size for starters. I would make the second version with 6 1/2″ blocks because that is the size I am fascinated with at the moment. Please share any quilts you have using this block. I love to see your work, too!

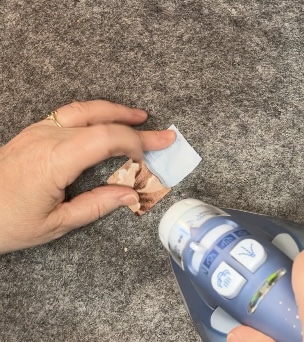
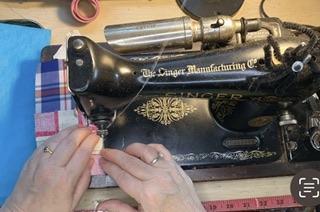
I took a short break today from quilting to fix some jewelry, etc. I played with glue…not the hot kind…

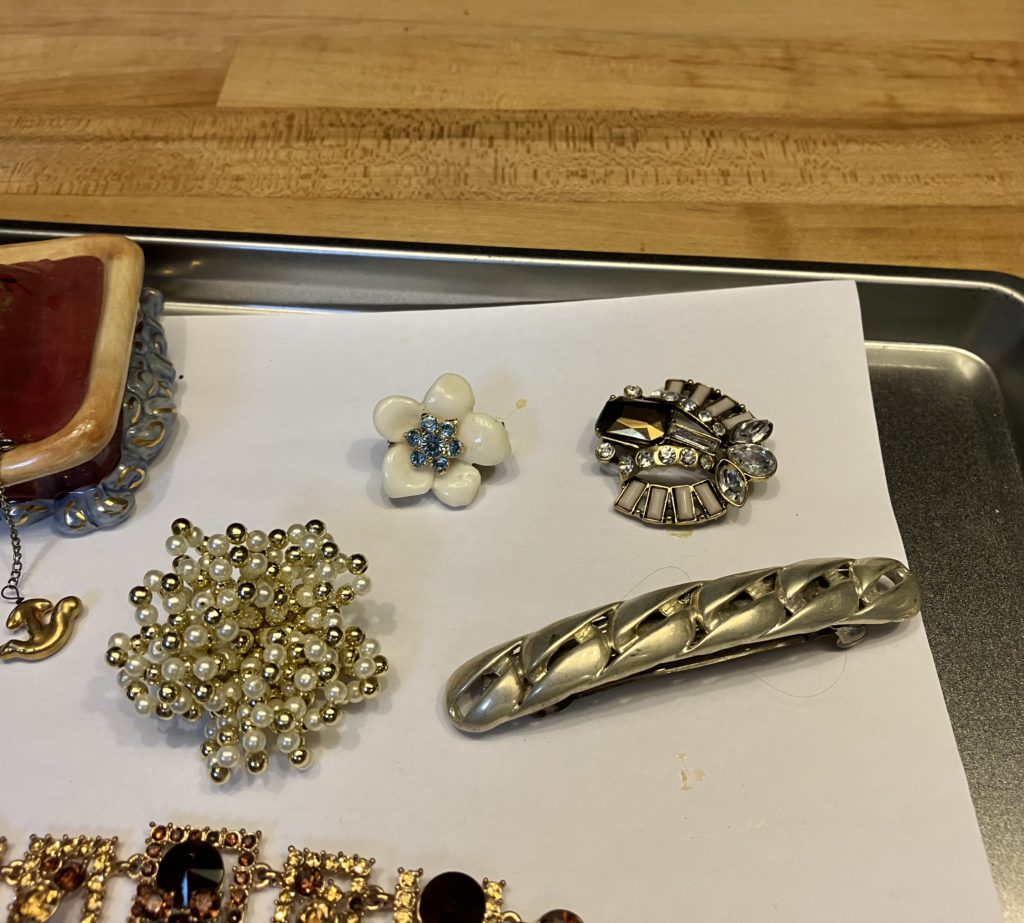
Some of this is very blingy. I think that bracelet in the middle is Sarah Coventry. The cat will be so impressed when I am wearing that to work in my sewing room.

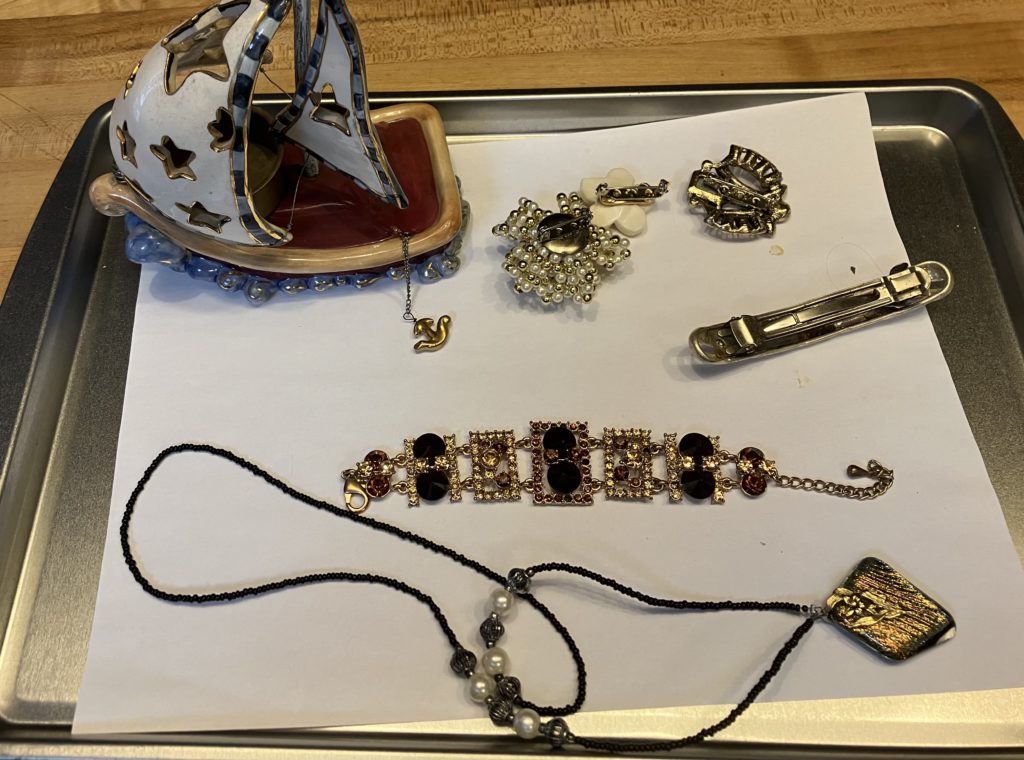
I used to wear pins all the time. Maybe I need to impress the cat with those, too. That one looks like a scarab beetle…creepy and cool simultaneously.

The barette is sterling silver. It is incredibly heavy. The barette part had come off the decorative piece. I think I finally found the correct glue. Hot glue was not it.

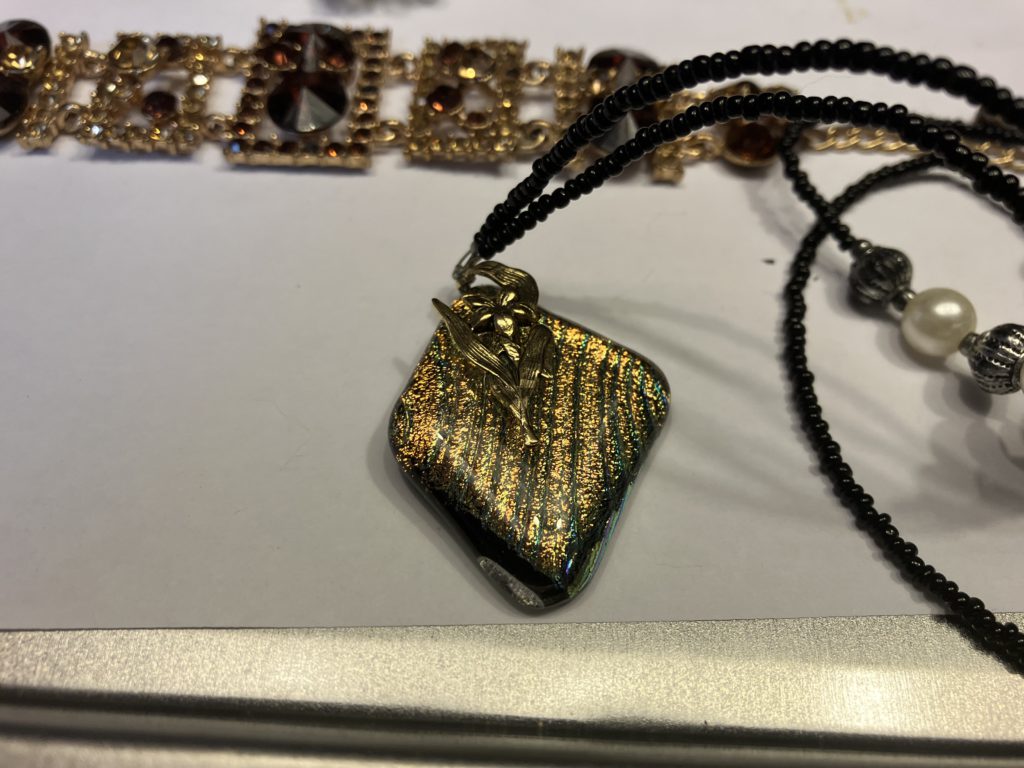
I used to work with a lady that would create and kiln her own glass pendant pieces. I added a charm and a beaded “chain” to this one so I could wear it. I love the foil in the middle of this one!

I hope you have enjoyed this week’s build a block presentation…and my other ramblings. What are you working on? We are quilters…and sew so much more!

Later,

Lorrie

Categories
Build a block quilting scraps sewing

Build a Block: Jewel Box

I am in love with this scrap block! After I made one, I just couldn’t stop. I still do not have these blocks out of my system. I love the contrast of the scraps in this block. When multiple blocks are assembled together, a fantastic secondary design appears. (I show four of these blocks together at the end of this post.)

If you would like to see this presentation in video form, please view it on my YouTube channel here.

For this block, you will need: (alternate size chart is at the end!)

  • 16- 1 1/2″ background squares
  • 16- 1 1/2″ scrap squares
  • 4- 3″ background squares
  • 4- 3″ scrap squares

The pieces listed above uses the two at a time half square triangle method. That is a tutorial for another day.

OR if you have a bunch of bonus half square triangles, you can use 8 bonus half square triangle units that are 2 1/2″.

If you are using all squares, you will follow the next few steps to make your half square triangles.

More often than not, my sewing is a scant 1/4″ when I use this method. I would rather have a little extra to trim off than have a unit that is undersized.

You can use your rotary cutter and ruler for this part if you wish, but I always just cut the pieces apart quickly with my scissors.

Press to the dark fabric. If you are using this method, you will need to trim. Fabric stretches, sometimes a little…sometimes a lot…during this method. Accuracy at this step will make your life so much easier when it comes to final assembly of the block.

We are ready for the zoom zoom part of this block…speed piecing! Join all of the squares in pairs of 1 background to 1 scrap.

I am pressing open because I am piecing 1 1/2″ squares together. I want to reduce the bulk and chance of distortion. If I were making the largest size of block on the chart, I would probably press to the dark.

After you press all of you pieces to your heart’s desire, Match up pairs to make eight 4 patch units. If you pair them up before you start sewing, you can insure that you don’t have duplicates in any of your four patches…unless that does not bother you.

Sew pairs together.

Press to your heart’s desire.

Here is the only tricky part…just be a little careful! You are pairing up the four patches with the half square triangles in this step. Pay close attention to the orientation of the blocks when you lay them out. You can stack all of the pieces in two piles to get ready for speed piecing. All of the units are the same.

Zoom, Zoom! Flip one block right sides together and sew together with an accurate 1/4″ seam. Be as careful as you can to keep seams flat. (If one gets flipped underneath, it is not the end of the world!)

Press to your heart’s desire.

Layout your pieces. You will notice that some of the blocks will be turned horizontally and some will be turned vertically. It is all good!

Sew the units together to make a new and improved 4 patch.

Press to your heart’s desire.

You now have 4 units. You are so close to being finished! Lay them out again to make sure they are oriented in the right direction.

Sew them together in pairs. You now have halves!

Press to your heart’s desire…again.

Sew the final seam…

Press to your heart’s desire.

Give the front of the block a nice press. Beautiful!

Here are four blocks set together.

When I showed this block to my husband, he made a “meh” face. He didn’t really like the block…too busy. When I stepped back, across the room, he was much more impressed. When I showed him the four blocks together, he was even more impressed. These blocks are like moss…they grow on you!

Here is the cutting guide for the other size pieces:

I hope that you enjoy making this block. It is a great way to use up those bonus half square triangle blocks. It would be a great leader/ ender project.

I think that I am going to add a round of these blocks onto my son’s car quilt…but that is another story for another day, too.

Have you tried this block? Drop me a comment below…or send me a picture at gmail. I love to see your work!

Later,

Lorrie

Categories
Build a block quilting scraps sewing

Build a Block: center surrounded by 2 strips

This block is quick and easy to construct! I know that I say that almost every week, but it is true every time I say it. Using contrasting scraps is the best way to make this block pop! I pulled strips and squares from my “pre-cut” bins to make this a faster finish.

A one minute video of this block construction is available here on YouTube.

Presenting a New Feature at the bottom of this post! I have added a fantastic size chart for pieces to cut. It contains a variety of finished block sizes. Check it out at the end of this post!

The version shown below is constructed from a 2 1/2″ square in the center and 2 different 1 1/2″ strips surrounding it.

I did cut my strips to the following lengths:

  • 2- 1 1/2″ x 2 1/2″ (inside round color)
  • 2- 1 1/2″ x 4 1/2″ (inside round color)
  • 2- 1 1/2″ x 4 1/2″ (outside round color)
  • 2- 1 1/2″ x 6 1/2″ (outside round color)

This week I have words imbedded on the pictures, as well as arrows. This is a no brainer approach. Please remember to always use a good 1/4″ seam, no matter how crooked the arrows are in my photos.

Please add the 1 1/2″ x 2 1/2″ pieces to the center here.

There are not a lot of bulky seams here, so I press out.

Add the 1 1/2″ x 4 1/2″ pieces to the sides here.

Now is a great time to press it flat, flat, flat. By pressing now, the block will be crisper and flatter for the next round of strips.

Please add the 1 1/2″ x 4 1/2″ outer round pieces to both sides. (I forgot to take the picture before I sewed one of the pieces… oopsy!)

Give the strips a quick press outward.

Add the final two 1 1/2″ x 6 1/2″ strips to both sides.

Press outward one last time. If you want the block to be even flatter, give it a little shot of starch or Best Press at this point.

Tah-done! I love this little block! I told you it was quick and easy!

Below is the new size chart! This took some work to figure out how to embed this in a blog post…making the chart was the easy part!

Please let me know in the comments if you like this new feature. I look forward to hearing from you.

Later,

Lorrie

Categories
Build a block quilting scraps sewing

Werquilters Build a Block: Square Surrounded

This post is related to the YouTube short that shows a sped up version of the assembly of this block. See the YouTube video here. This block makes a great leader/ender project to use when assembling another project.

This block is made with 1 1/2 and 2 1/2 inch squares. It could easily be made from other sizes. Block construction is simple.

Using your smaller squares, make 4 sets of 2 squares.

Press open…or however you desire.

Join 2 of these sets to your center square on opposite sides.

Press towards the larger center block.

Add blocks to the ends of the 2 sets of 2 squares as pictured below. Then press seams open.

Add blocks to the center unit on both sides.

Press seams open or however you wish.

Ta-Dah! One little scrappy block!

I hope that you are enjoying this series of Build A Block! I am having great fun using up those scrapps while I share with you! I would love to see what you are up to today!

Later,

Lorrie

Categories
Build a block quilting scraps

Werquilters: Build a Block 9 patch turned 4 patch

It is time to use up some more of those scraps! Let’s make another basic block…9 patches added to larger squares to create a 4 patch. These blocks are versatile. When set together, they make an adorable scrap quilt. See my YouTube short showing this same block. It is part of my series on using up bonus half-square triangle blocks.

Here is a block waiting to be sewn. You will need the following pieces to make this 6 1/2″ block:

  • 2- 3 1/2 inch squares
  • 18- 1 1/2 inch squares to make both nine patch blocks

This block could easily be made in a variety of sizes: 12 1/2″, 18 1/2″, etc.

Start by speed piecing the rows of the nine patches.

Press the seams open…if you wish.

Sometimes I use my fingers to gently pull on the block so I can get the seam open to press it. Without burning my fingers, of course.

Look at those nice, little rows. Sew the rows together.

I press these seams open, too. It cuts down on the bulk and the blocks lay flatter.

Occasionally, I have difficulty getting those seams open. I have a stylus…actually it is a dental tool from the hardware department of a flea market…that helps me grab the seam.

You can see my stylus a little better here in this picture.

After the 9 patches are ready, sew the bigger blocks to them. Press towards the larger block.

When you turn the block pieces around, the seams will nestle.

Press the seam whichever direction you so desire…or open if you want.

Tah-done! What a cute little scrappy block!

What blocks have you been making to use up your scraps? Please comment below. I can’t wait to hear from you!

Later,

Lorrie

Categories
Build a block quilting scraps

Werquilters: Build a Block Scrappy Star

This week, I am adding a second block, the scrappy star. It is pictured here as a 4 1/2″ block. It could easily be made into a 8 1/2″, 12 1/2″ or 16 1/2″ block.

This tutorial reads like a picture book. I learned how to edit photos! Many of the directions are right in the picture. This also matches my YouTube short that shows how to use up some of those bonus triangles we all have. Most of the pictures are the same as those in the video, too.

Here is the finished star:

I have been making these as leader/ ender blocks for the entire summer. I have a nice little pile going.

The first image is parts you need if you don’t cut triangles to make this block. The directions are in the pictures below to make the triangles from squares. Just look for the tan and yellow squares.

This second picture, with the lavendar background, is the number of pieces that you need if you ARE cutting the triangles. I use an accuquilt die to cut those little triangles, but it is not necessary to have one of those to cut pieces.

The easiest way to make any block, is to lay out the pieces before you start.

The first sewing step is to make the 8 half square triangles, whether you are using triangles or squares.

The images with brown fabric are constructed from squares.

I love the washi 1/4″ tape. It doesn’t leave a residue. It stays on for a long time. There is a lot of it on a roll.

Now that your star points are sewn, it is time to press.

Background fabric should be towards the inside. Star points should be on the outside.

Sew the star point pieces together in pairs.

I prefer to press these seams open to reduce bulk. You can press the seams to the side if you prefer. I know this is a controversial topic in the quilting world. No judgements here!

Lay your pieces out again. This is a double check of your star points, etc.

You have the parts assembled for all 3 rows.

Time to finish the block. Sew the rows together.

Again this is to reduce bulk in these little seams.

Here it is again…the cute, scrappy star block.

I hope you are enjoying making little scrap blocks. There are many more blocks to come!

What is your favorite scrap block to make?

Later,

Lorrie

Categories
goals quilting scraps weather

Quilting Life 2023 Mystery BOM

I told you a couple of weeks ago that I would share my participation progress in some sew alongs. To find this block of the month, google “Quilting Life 2023” or click here. This block of the month is run by Sherri McConnell.

Blocks for this year are available in 12 inch and 6 inch. So far, the pattern is on one page (for those of us who like a paper pattern to look at). Video tutorials are also available on YouTube.

The pattern is available on the first Monday of every month. Please check the website for availability after the fact.

I am making both size blocks.

Progress so far…

I am using as much scrap fabric as possible, especially since I organized!

I also have a few spring pictures to share:

Forsythia in neighboring yard
Volunteer white peach blossoms…growing in the compost

Now on a sad note…I am tired of deleting spam for pharmaceuticals, porn, and whatever is being sold or talked about in Russian etc., so I am turning off active comments. Please e-mail me directly.
I love to hear from you!

To wrap it up this week, I hope you are having fun making…maybe participating in sew alongs. Hope you weather is making spring flowers appear! What are you working on/ seeing in nature this week?

Later,

Lorrie

Categories
quilting scraps

Finished top, etc.

I finally got the sashings and cornerstones on the blocks to finish the top for a quilt. I used a lovely gray batik. It does make the bright colors of the scrappy blocks pop.

Finished top

…and there is more!

While I was cleaning and organizing my sewing room, I found a box of scraps. This box was given to me by a substitute teacher that frequented the building I taught in. I have had these scraps for a while…since sometime before March 2020 (when Covid lockdowns began).

Scrap box…medium clear box

All of these scraps are around 2 inches…some are a little smaller. They are perfect to trim to 1 1/2 inch squares or triangles to make 1 1/2 inch half square triangles.

Accuquilt dies to trim scraps
Lots of pieces…more to come
4 1/2 inch star

I now have enough little pieces to string piece bonus blocks between all of my other projects! 😁

Have you unearthed any projects recently? I would love to hear from you!

Later,

Lorrie

Categories
quilting scraps Uncategorized

Continuing a Sampler Spree Quilt again…5th time is almost a charm

I am still working on the 100 blocks from the Sampler Spree book. Only 18 more blocks to go!

Here are the 35 blocks that I created during the month of October. I was incredibly productive. We were at the cabin in Michigan on Long Lake. I made most of these blocks while my DH watched football. I am loving retirement!

Here is my tracking sheet. There are fewer and fewer plain white numbers left that have not been made. I am a little late getting started on November blocks…only one so far.

I had a serious brain glitch when I put this block together. The picture on the right is the correct assembly for the Buoy block. I incorrectly 1) added the corners and 2) assembled the block on the left. I think it looks like a butterfly or a beacon. I am embracing my stupidity and counting it as a bonus block!

I REALLY like the shape of this block. I think I will translate it into a larger size and make another scrap quilt. I am drawn to weathervane and quatrefoil shapes.

I also like these blocks. Who knows…maybe they will show up in some future scrap quilts, too.

This one has that four pointed shape that I am drawn to, but it doesn’t actually have the points. It was not an accident…they are not part of the block. This block would be fantastic for a fussy cut center.

Time to get back to making on this blustery last day of November! I have enjoyed making these blocks, but I am ready to be finished!

What are you making today?

Later,

Lorrie

If you would like to review the first installments, here are some links to follow:

  1. It starts!
  2. Second installment
  3. Third installment
  4. Fourth installment